Friday, December 31, 2021

The End of 2021

Although I have not stopped making quilts, I am going to taper off my blogs.  My first blog was posted in May, 2015.  That's 6-1/2 years of showing you my inspirations, hick-ups, winners and losers.  And musing about all sorts of things, mostly related to quilting.  However, this will be my last regular blog about quilting.  I may still post a few things here and there.  

Why?

I have spent a year writing a daily paragraph about nature, and I really like going on a walk, taking a few pictures, and thinking about how much nature inspires me.  This is more of a private, contemplative type of writing, and isn't something that I want to turn into a blog.  

A huge thank you to all of my readers and all of the wonderful comments you've made over the years.  

And I hope you keep quilting and loving it too!


Charity quilt #5 from Kaffe Fassett fabrics - Flying colors

This is the 5th quilt top that I made from the box of donated fabrics from Audrey Prothero.  She loves Kaffe Fassett fabrics and has so much that she asked me to see if I could make some charity quilt tops from them.  December is the month of the year that I dedicate to making charity quilts and quilt tops (also baking Christmas cookies!).  I had lots of time to sew with the snowy weather this year.

I found this quilt as a free pattern from Art Gallery Quilts and its called "Flying Colors".  I purchased 3 yards of navy blue grunge for the background and used the Kaffe Fassett material for all of the colored pieces.  It's entirely made from flying geese blocks and using the no-waste method that is also detailed in the free pattern.  The quilt pattern makes a quilt that is 60" x 60".  That is a tad too short for our charity group, so I added 3 @ 3" strips at the top, middle and bottom.  This quilt top measures 60" x 69".

I hope you like it!

Charity quilt #4 from Kaffe Fassett fabrics

This is the 4th charity quilt top that I made from the donated Kaffe Fassett fabrics.  It is very similar to the one that I previously posted, but with the center square slightly higher. 


I purchased all of the brown grunge fabric for this quilt top at Fiddlesticks Quilt Shop in Vancouver, WA. The striped shot cottons were mostly green and red, giving this quilt a holiday feel.

I hope you like it!

Thursday, December 30, 2021

Charity quilt #3 from Kaffe Fassett fabrics

This is the 3rd quilt top that I made for charity from the donated Kaffe Fassett fabrics. 

I bought all of the solid brown fabric and used a lot of the shot cottons that were in the box of donated fabrics.  One more quilt top is in the process and will be uploaded in a few days.

I hope it will make someone happy!

Oh, and this is the sketch that I made for this quilt:


Wednesday, December 29, 2021

Charity quilt #2 from Kaffe Fassett fabrics

This is the second quilt top that I made for our charity group from the donated Kaffe Fassett fabrics.

I made this with the scraps from "Diamonds in the Sky".  Some pieces from a couple of other fabrics were fussy cut, and then I added strips to the half square triangles to make them the same size.

It's 56" x 70".


 I hope you like it!

Monday, December 27, 2021

Charity quilt #1 with Kaffe Fassett fabrics

One of my small quilt group friends gave me two boxes of Kaffe Fassett fabrics to use for sewing charity quilts.  I added the off-white grunge for all of the sashing.  

This is the first quilt top from the box.  Its called "Diamonds in the Sky" and was designed by Melissa Lunden.  Finished size is 64" x 66".


I hope you like it!

Monday, December 20, 2021

New York Beauty Improv quilt, top is finished!

This is a continuation of many previous posts about the making of the New York Beauty improv quilt.

I tried out several different designs for the setting strips.  Here is what I decided.  This layout will end up with a quilt that will be 70" x 70".  Just the right size for me to be able to quilt on my sit-down longarm.


I pieced a few of the setting strips with alternating black and dark blue fabrics.  It seemed a little too dark, so I sewed the rest with some light blue pieces.   I brought in some more medium blue and red with circles set into the "center" of the New York Beauty blocks.  Here's the finished top.


I hope you like it!


Sunday, December 12, 2021

New York Beauty, improv quilt, part 4 or 5?

This is a continuation of previous posts about the making of the New York Beauty imrpov quilt.

All 16 blocks have been completed and trimmed to 14-1/2" x 14-1/2".  I arranged the blocks into groups of 4 that included points, circles, ovals, and wedges.  Here they are:


Next, I'll work on the design of the setting strips, and decide if I want them or not.  In the meantime, I found a new red hat for my birthday.


I hope you like it!

Monday, December 6, 2021

Improve quilt, making components that look like floating rectangles

This is a continuation of several posts about the making of the New York Beauty improv quilt.  This post about the making of another one of the components, which ends up looking like floating rectangles.

I cut a black strip of fabric at 1" wide, and two strips of white fabric at 1-1/2" wide.  They were sewn together into a strip set and pressed towards the center black strip.


I also cut a white strip at 3" wide.

The best way for me to describe my paper piecing is to show you the steps.  All of these steps are after you have your freezer paper foundation ready to go.


Step 1.  If all of the pieces are the same size and shape, just cut one template piece out of freezer paper and add 3/8" around all the outside edges.  For this piece, all of the them were a different size.  So, in this case, cut a template for each piece, number it and mark the left side.  


Step 2.  Pin the freezer paper template on the BACK of the fabric and cut out at least 3/8" around all the edges; even more if you are uncertain.  Make sure that the LEFT side of the template is parallel to the left side of the fabric, and at least 3/8" away.  Note:  Every other piece is solid white.

Step 3.  Place all of the templates/fabric pieces are in a pile with #1 on the top, and the left side on the left side. 

Step 4.  Pin the first piece in place, trim the seam to 1/4" and pick up the next piece and place it right sides together with the first piece, making sure that the LEFT side of the second piece is where you will be sewing the seam.

Step 5.  Sew the seam.  Trim if necessary.

Step 6.  Press.

Step 7.  Trim the excess fabric to 1/4".  And repeat all the steps until all of the pieces have been sewn and pressed to the foundation paper.  Make sure to alternate the pieced rectangles with the solid white background.

Finally, press the piece really well and trim the curved edges to 1/4" seam allowance.

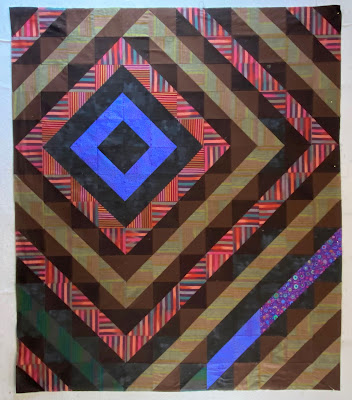
Here is the final component.


And here it is in the block.


I hope you can use this technique somewhere in your quilting.