Monday, August 28, 2023

Carnival Flower - Final - "Carnival Vibrancy"

I had my quilt top custom quilted by C squared quilting and Corrie Coldwell did an amazing job!  I love it so much!  She posted pictures along the way on Instagram which kept me on the edge of my seat.  She bought thread to match the fabric, changed colors, and spent a lot of time doing the custom quilting.  I was able to pick it up a few weeks ago, and the binding is all done.  It's 80" x 80".  I've named it Carnival Vibrancy.

Here it is:


I just love it and I hope you do too!

Monday, August 21, 2023

Ice Dying Workshop

I went to an ice dying workshop for the Clark County Quilters recently.  It was my second time taking the class taught by Ann Robertson, who is an expert on fabric dying.  She is so knowledgeable with years of experience in dying fabric.  This time, she showed us some different techniques, like dying at an angle inside of a piece of gutter, folding and crimping, using rubber bands and waxed twine.  Her samples were jaw dropping!

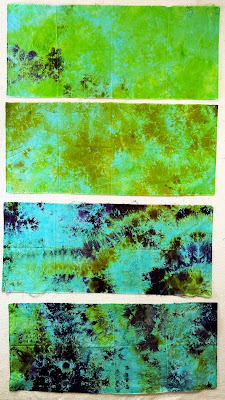
Since I had done a little ice dying, I thought that I would try new things.  I started with 4 pieces of white fabric at home and put them into a vat of turquoise dye.  They soaked for about 2 hours before they hit the ice dying process.  The other 4 pieces of fabric were prepared and dried by Ann, so they were all ready to into the ice dying containers.  

For the turquoise fabric, I squeezed out the excess dye, scrunched the fabric into the baskets, then added ice on top.  I added dye powder in lime pop, chartreuse, gunmetal, and imperial purple in various combinations.  Then I sprinkled a bit more soda ash on top, and added another layer of ice on top of that.   Ann let us know that they soda ash soak normally used is 1 c. soda ash to 1 gallon of water.  for ice dying, she uses 2 c. soda ash to 1 gallon of water.  That's why she suggested sprinkling more soda ash on top of the immersion dyed fabric.   Here are the results of those 4 pieces.


With the white pieces, I put marbles in one and secured them with rubber bands.  In another one I twisted a few spots and secured those with rubber bands.  On another one, I twisted in a couple of spots, and tied it in two places with waxed twine.  The final one was scrunched.  I added the same dye powders as above, and also Cerulean blue.  Frankly, I can't tell you which piece is what, but here are the results.


I really like how they turned out.

I hope you like them too!


Monday, August 14, 2023

Green Lady #3 - part 2

This is a continuation of a previous post about the making of Green Lady #3, the third in my series of green ladies with a garden based theme.

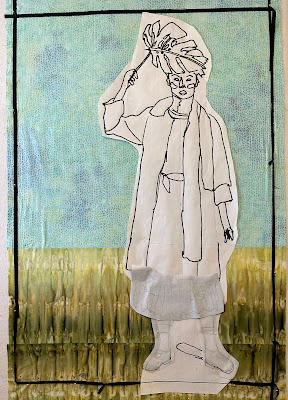
I made the background with a couple of fabrics that I had on hand.  I intended to add a lot of stuff on top of these layers, but left that until later.


The dress and jacket were the next items that I made.  I traced my pattern onto freezer paper.  I auditioned fabric that I had received with an Asian theme to honor the model in the original picture.  The only one that stuck was the gold used for the dress.  My thinking was that since I had hidden her eyes, the model no longer looked Asian, and therefore, I was free to choose other fabrics from my stash.  

The jacket was made from a gold-flecked green fabric.  I topped it with wool roving, thread, snippets of fabric, Angelina fibers, dyed cheesecloth, and light green tulle.  This was stitched down with a green metallic thread.  After it was stitched, I laid the freezer paper pattern on top and sewed through the freezer paper on the stitching/outside line.  


Then, using a glue pen, I glued under the edges that would be on the outside.  The edges were pressed underneath a non-stick applique sheet so that the glue and the freezer paper wouldn't get stuck to the iron.


When all the pieces were done, I started building the dress, matching up the lines on the freezer paper pattern.


Those edges later were stitched with an invisible thread and a zig-zag stitch.

I hope you like it so far!


Monday, August 7, 2023

Green Butterfly Lady - Final

This is a continuation of 5 previous posts about the making of the Green Butterfly Lady.  I added some of the flowers and leaves that I had made, along with a few beads, and some more ribbon.  I loved doing this process.  My small quilt group does handwork every week, and this gave me tons to do.  When that was all stitched down, I added a few hot fix crystals.   And here it is - all done!


Now, I just need to come up with a name.  Got any ideas?

I hope you like it!


Friday, August 4, 2023

Green lady #3 - Part One

I had one more picture that I had saved of a green lady with a botanical look.  I decided that I would make it up in an art quilt to go along with my other 2 green garden ladies.  This picture was torn out of a magazine that was advertising a  Gudrun Sjoden dress called "Rigmor".  The designer is from Sweden and I didn't save the name of the magazine or the date.  I think it was from a British magazine from 2018.

Anyway, I traced the picture and had it enlarged to be the same height as my other two green garden ladies.  Here is the picture on my design wall with components pinned on top.


I decided to make a garden scene on the bottom third of the art quilt.  So, I got out my sketch book and put my ideas down on paper.   


I started making the face and hands first.  Here they are with fusible backing all ready to add to the quilt top.


You may have noticed that I didn't do the eyes on the face.  My first quilt had a headpiece covering the eyes and I liked that effect.  The philodendron leaf will cover that part on this quilt. 

I hope you like it so far.