Monday, November 13, 2023

Improv drunkard's path blocks

I am making a quilt that has drunkard's path blocks dispersed throughout the top.  I saw the quilt in a shop in Walla Walla, called "Stash".  They didn't have the pattern for sale, so I looked it up after the trip.  It was a quilt designed by Natalie Crabtree called "Mix and Mingle".  And it was so modern and cute that I knew I just had to make a version of it.  When I say version, what I mean is that I like improv and intuitive placement instead of blindly following a pattern.  

Anyway, here is the process I used for the drunkard's path improv blocks.

Stack the two colors together, right sights up.  Cut a gentle curve with a rotary cutter about 2/3" away from the left edge.  You can see the ruler below is at about 3.75" on the 6" square.


Switch the two pieces so that the light color is matched up with the darker color.  Place a pin at the center of both pieces.


Line up the pins and pin the pieces together with the concave (or inny) piece on top and the convex (or outie) piece on the bottom. 


Using a glue pen, gently glue the pieces together from the center towards the edges.


Sew a scan 1/4" seam.  Try to sew slowly to make sure that you don't get any wrinkles in the top piece.


Press towards the outside of the block.  You'll get two blocks, with the colors opposite of each other.  Since these are improv blocks. you can see that they don't match up like they would if you used a pattern.  That's the reason why they start with oversized squares.


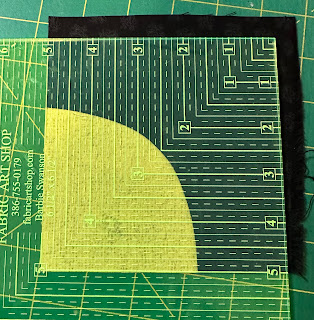
Trim the blocks to the correct size.  I needed a 5" block and I started with 6" squares.  First, line up the ruler on the pie, or inner piece and trim both sides.


Turn the block and trim the outer edges. 


And its just that easy to make an improv drunkard's path block.  

Monday, November 6, 2023

Challenge quilt to celebrate 50th guild anniversary

Clark County Quilters in Vancouver is celebrating their 50th year from the very start of the guild.  The guild has put out a challenge to make a quilt celebrating the 50 year anniversary and to enter it into the quilt show in April 2024.  I did a rough drawing of balloons and a banner.


After looking at several photos of balloons, I realized that they weren't exactly circular, but more rounded on top and thin at the bottom.  I also noticed that I had 4 balloons, which is an even number.  So I added one more and 5 balloons fit better with the 5 decades of the guild.

My idea was to use LED lights for the largest balloon, and do them in shiny material.  I gave up on this idea early on and instead used gold fabric and ice dyed fabric from my stash.  I don't know why I didn't take pictures along the way, but that is how it goes sometimes when I get into the groove.

It was quilted on my domestic machine with gold thread and has some gold trim and green yarn couched down.   I added purple and gold sequins and beads after this picture was taken.   It's 24" x 34".


I like how it turned out and I hope you do too!!


Monday, October 30, 2023

Synaptic - Final

The synaptic quilt is done!

It was quilted by Alvera Gaskins with a digital design called "Modern Curves" by Anita Shakeford.  I absolutely love it!  She used a variegated thread, which really adds to the movement.


It's 66" x 66".

I hope you like it too!

Monday, October 23, 2023

Lime Twist - Mod Quilt Squad Challenge - FINAL

This is a continuation of 3 previous posts about the making of the Lime Twist challenge quilt.  And the final too.

I quilted the piece with a wavy stitch on my domestic machine.  On the Bernina, it is stitch #1318, set to 4.1 width, and 24.8 length.  I used green thread throughout.

I used black batting and a pieced backing.  And then finished it off with a facing.  It's 24" W x 53" H.


I hope you like it!


Monday, October 16, 2023

Lime Twist - Mod Squad Improv Challenge - part 3

This is a continuation of two previous posts about the making of the Lime Twist Improv Challenge piece.

I had to remember was that the piece would get much smaller when it got pieced together, and I had to be able to piece all the different sizes of blocks together.  Here are a few pictures of the piecing process that I started from the top.  There were a few pieces that had to be inserted as coping strips, and other pieces that needed to be made.  I also ended up doing a lot of partial seams!  I think that it ended up with the same concept as what I had when the blocks were just up on the wall and not sewn together yet.  


And the final top all sewn together.


I hope you like it.  I'm certainly happy with the improv nature of it.


Monday, October 9, 2023

Painted fabric and improv pieced quilt- Improv Transparency

I painted a yard of fabric a while ago and hadn't been able to cut into it or find a use for it as a background.  The white squiggly lines were made with a glue resist, painted over, then washed out. 


Finally, I decided that I would use it for an improv quilt.  A few months ago, one of my friends taught us how to take advantage of transparency in a quilt.  We made 18" blocks with free hand curved lines.  I used turquoise shades and a white and black print.  


Some of the others in the group made 4 blocks and sewed them together.  They looked fabulous!  But I didn't want to do the same thing.  So, I cut it each block into 6 pieces and inserted 5 strips of my hand painted fabric.   Here is the result:


I felt like I was onto something, so I made a couple more in shades of turquoise and blue and had enough of the painted fabric to do a couple more.  I put them up on my design wall and played around with the layout.  In order to make them all fit, I used some coping strips, cut edges off of some and placed them in other places, and finally, sort of straightened the edges.  

I quilted it with several colors of blue and green thread in 1/4" lines that curved to match the shapes in the quilt.  There were A LOT of stops and starts, which I handled with tiny starting and ending stitches, as well as some that were tied off.  And here it is after the quilting.  Its 35" to 37" w x 52" to 53" h.  (The dimensions reflect a slight difference as the quilt is not totally square).  I've named it "Improv transparency". 


I hope you like it!


Monday, October 2, 2023

Lime Twist Challenge Quilt - part 2

This is a continuation of a previous post about the making of the Lime Twist Challenge quilt.  I also wrote a few blogs about making skinny inserted pieces.  I made pieces that were both curved and square-ish and tossed them up on the design wall.   Here's what the jumble of improv pieces looked like when I had a few made and started to make sense of the jumble.  


I could see that there was circular connection with some of the blocks.  So, I decided to make a few more and fit them into that section.  Some of the pieces were intentionally made long and skinny; some were made small and patchy.  In my late night musings, I also thought about appliquéing a few circles on the top.   I like the prints that I used and the tiny bits of orange that started to show up.   Here were the next few steps which involved making the next block or two that would seem to work with what was already on the design board.  This is part of what makes improv tough....what to do next.


And then the next few pieces tossed up on the wall, plus moving a few others around.


It was time to let it sit for a few days and take another look.

I hope you are enjoying the process so far.