Showing posts with label lime green. Show all posts

Friday, March 20, 2026

Sheer class with Kathie Kerler

My guild, Clark County Quilters, recently hosted a class led by Kathie Kerler on how to use sheer fabric overlay to make a wall hanging.  It was a really clever way to add applique without having to sew around the edges first.  The quilting stitches held the applique in place!

I have been challenging myself to make fiber art pieces WITHOUT lime green and decided for this piece to use turquoise shades.  A few people in the class were shocked that I didn't bring green to the class.  

The piece was put together in the class with fused fabric pieces cut out on her cutting machine.  I used both circles and stars.  Then, I quilted around all of the motifs in the class.


I'm not sure if it's quilted enough for me yet.  Anyway, I hope you like it at this stage.


Monday, December 1, 2025

Green Scrap Quilt with skinny brown lines - "Skinny It Up"

This is a continuation of a previous post about the making of the 3rd green scrap quilt; this one with the skinny brown lines.

I quilted this one on my sit-down longarm machine with lime green thread.  I decided to echo the brown lines with quilting that was spaced 3/4" apart and 2-1/4" apart and add some bubbles in the large spaces.  It was a bit of a bugger to quilt since I had to stitch on the diagonal using a ruler to get the spacing.  Unlike a regular longarm, I was able to maneuver the quilt like you would on a sewing machine.  And that's the difficult part, because at times the entire quilt was in my lap.   

After I quilted it, I cut the edges a little more curvy than they ended up to make it more off-kilter.  I added 1/8" grosgrain ribbon to the edges to give it some stability, and then faced it.  

I'm not sure how you would measure it, but loosely, it is 42" W x44" H.  I called it, "Skinny It Up".


I hope you like it!

Monday, September 22, 2025

Palate cleanser

I struggled with what to make for my next quilt.  It was an odd time for me as we prepared for a 2 week trip to Hawaii, with hip surgery following that trip.  Sometimes, knowing what and where to start are a little hard; there's so many, many ideas floating around in my head.  That's when a palate cleanser is needed.  You know what I'm talking about.... something that you can make in your sleep, something to do with your scraps, playing around with techniques with no goal in mind, or making some quilts for charity and thinking about someone else in need.

I pulled out my scrap bin of greens and blues and started sewing them together.  It's a bit of a messy process as you can see in the picture.  I didn't use a foundation; just sewed them together and flipped and pressed as I went along.


I sewed enough pieces together to make 9" blocks that resembled crazy quilt blocks or modified log cabin blocks.


Then I cut 9" blocks out of dark navy blue fabrics and sewed these together to make half-square triangles.  I pressed the seams towards the blue fabric.  The blocks were trimmed to 8-1/2".  I was lucky that I got that size since I started with 9".  I think the trick was to sew a scant 1/4" seam on either side of the center line, so that I got the maximum size in the end. I put up  them on my design wall and played around with a setting.

This top would only be 40" x 56", which is a little small for a lap or twin sized quilt.  Even my husband said that it looked a little small when he poked his head into my studio.  

I thought about doing something else besides making more scrap blocks, but anything that I thought of just didn't float my boat.  So,  I went back to the sewing machine and made more scrap blocks.  I only had to make 5 more in order to get 10 more finished half-square triangle blocks.  Anyway, here are the blocks on the wall all ready to sew together.    It should end up at 48" x 64".  But I headed to Hawaii for a couple of weeks, so you'll have to stay tuned to see the finished top, or maybe even the finished quilt. 


I hope you like it so far! 


Monday, January 13, 2025

CCQ Challenge 2025 - Give Peace/Piece a Chance

Our local quilt guild, Clark County Quilters, issued a challenge for 2025 called, "Give Peace/Piece a Chance!".  Here where the rules:  

(1) The size of the quilt could be no more than 120" in perimeter.  

(2) The quilt background should be pieced reflecting your idea of peace and you must include a peace sign somewhere on the front of your quilt.  

(3) All steps must be done by you.

I am always up for a challenge!  I remembered that I sketched up an idea for a quilt a few years ago, which was a hippy girl.  I found that sketch and started drawing a full size girl for this quilt, based on that idea from a few years ago.  It really helps to keep a sketchbook of ideas so that you can go back and visit things you saved.

The background was, of course, going to be lime green.  I pulled greens from my stash, including 3 pieces of silk.  These were all improv pieced into small log cabin blocks.  The blocks were put together into rows, using sashing pieces here and there, and trimming others to fit.  I left the background a little wonky, with the top width larger than the bottom width.  Here it is all ready to go.


I placed the drawing of the hippy girl on top to make sure the back was big enough.


Then I made the clothing and the face for the girl.  The pants were quilted with gold thread into peace signs.  The necklace peace sign was made of silver lame.  The necklace chain was silver trimming that was couched down.  And the glasses were made of copper lame.   I didn't take any pictures of the process, though.  Its a mystery to me why I remember to do this sometimes, and at other times, I get so caught up in the making of the pieces that I totally forget to take pictures.  When the creative juices are flowing, I'm in the groove, I guess.

The girl was appliquéd to the background and the face was highlighted by a little bit of colored pencil and inking.  Then,  I quilted the background with peace signs all throughout and lightly quilted the clothing and face.  It was faced.

It turned out to be 18" W at the top and 29" long.  I titled it "Peace Out".  


I hope you like it!


Monday, June 10, 2024

Duckworth Charity quilt - Final

This is a continuation about the making of the Duckworth charity quilt as part of the Mod Squad challenge.  I kept making improv log cabins until I had about 60, then I tossed them up on the design wall.  It's bright!  


I thought that I would try to insert a solid (ish) block here and there to give some rest for the eyes.  I liked that idea, and ran with it.  Here's the completed top.  It's 48" x 60".  


I hope you like bright quilts!

Friday, March 8, 2024

Bog Coat

I recently took a class from Kathy Powell on how to make a reversible bog coat.  It was so different and so fun!

I used some gorgeous material from Marcia Derse as the outer layer and a gray and white batik for the inner layer.  I had a ton of lime green ombre fabric that I used for the 3" finishes around the neck, the sleeves and the bottom.  This loose fitting jacket was so different than any other pattern that I have sewn.  For sure, I was skeptical that it would turn out looking like something wearable.  But it was fun and entertaining to stretch my brain to make this coat.


I really like it and hope you do too!


Monday, October 2, 2023

Lime Twist Challenge Quilt - part 2

This is a continuation of a previous post about the making of the Lime Twist Challenge quilt.  I also wrote a few blogs about making skinny inserted pieces.  I made pieces that were both curved and square-ish and tossed them up on the design wall.   Here's what the jumble of improv pieces looked like when I had a few made and started to make sense of the jumble.  


I could see that there was circular connection with some of the blocks.  So, I decided to make a few more and fit them into that section.  Some of the pieces were intentionally made long and skinny; some were made small and patchy.  In my late night musings, I also thought about appliquéing a few circles on the top.   I like the prints that I used and the tiny bits of orange that started to show up.   Here were the next few steps which involved making the next block or two that would seem to work with what was already on the design board.  This is part of what makes improv tough....what to do next.


And then the next few pieces tossed up on the wall, plus moving a few others around.


It was time to let it sit for a few days and take another look.

I hope you are enjoying the process so far.


Monday, September 25, 2023

Inserting skinny lines perpendicular to each other

This is the 4th post about inserting skinny lines into improv blocks.

This post is about inserting skinny lines across a plain block, then cutting through it perpendicularly and adding more inserts.  All of the insert pieces were cut at 3/4" wide to start with.

The first block was done by slicing across the block and inserting a strip of gold fabric, with a reveal of slightly less than 1/4".  The block was then cut across in 2 areas and lime green strips of fabric were inserted.  This method slightly offsets the first line in the piece, which looks fine for an improv block.  I suppose you could get fussy and try to line up the pieces, but then your improv juices get turned off.


The second block was cut in half and the sides were then also cut in half.  Gold inserts were put into the halved halves (revealing 1/8" strips of gold), and then the two sides were sewn together with a slightly larger reveal (revealing 1/4" strips of gold).  This method preserves the straightness of the first improv insert.

I hope you try these techniques in some of your improv blocks.

Friday, September 15, 2023

Challenge piece for the Mod Quilt Squad - Lime Twist

The newest challenge for the mod squad group was announced.  The theme is "Lime Twist".  The pieces must have lime green in them, some gold, be improv pieced, be Kintsugi inspired, and be 24" W x 48-60" H.  I pulled out blue fabrics from the Marcia Derse collection, some dyed fabric, lime green and other shades of green fabric, and two gold fabrics for the color scheme that I envisioned.


I didn't start with a design, just the black lines of the space to fill on my design board.


Then I pulled out all of my books and blogs about making skinny lines and started making improv pieces.  This is a skinny line curved technique that I found in Irene Roderick's book.  I started with two pieces of 8" x 8" fabric, and 3/4" wide strips of the gold fabric.  It seems counterintuitive that you use straight pieces for the inset curved parts, but it works!  Well, with a little steam and starch and very skinny seams.  First, I free hand cut the first curve with both the blue and green fabrics stacked right side up.


Then, I took the 3/4" gold fabric and using an 1/8" seam, sewed this to the first curved piece.


This was pressed away from the skinny strip.  I trimmed 1/4" off the skinny strip and using a 1/8" seam and LINING UP THE PREVIOUS SEAM LINE, sewed the outside piece to the skinny strip.


I pressed the seam away from the skinny strip again.  Note that the sides won't match up anymore.


I decided that one more slice was needed, so I followed the same steps as with the first insert.  This time, though, I left a slightly larger piece of the gold, maybe a 3/16" width away from the first stitching.  After it was pressed, I trimmed the pieces to be even on the sides.  I ended up with two blocks with two inserts, one ended up being 6-1/2" x 7-1/2" and the other one was 7-1/4" x 8".   So, for future reference, I'll know that the final block is indeterminate until after pressing and trimming!  And that centering the pieces gives a little bit larger end piece.


That's all for now.  I'm going to try to write a couple of blogs about making skinny inserts so that I can share the techniques with my Mod Quilt Squad.

I hope you like the pieces so far!

Monday, May 1, 2023

Green Butterfly Lady - Part One

After making the Northwest Garden Lady art quilt, I decided to make 2 more green lady art quilts.  I LOVE LIME GREEN!  If you've been reading my blog, you already know this about me.  I have green doo-dads all over my studio, and frankly, all over the house.  I collect green depression glass, have a lime green stand mixer, lime green dishes, lime green clothes, lime green front door, lime green patio furniture, plus a lot of other stuff.  I just bought a lime green rain coat from Pendleton!  I am just so happy and delighted when I surround myself with lime green.

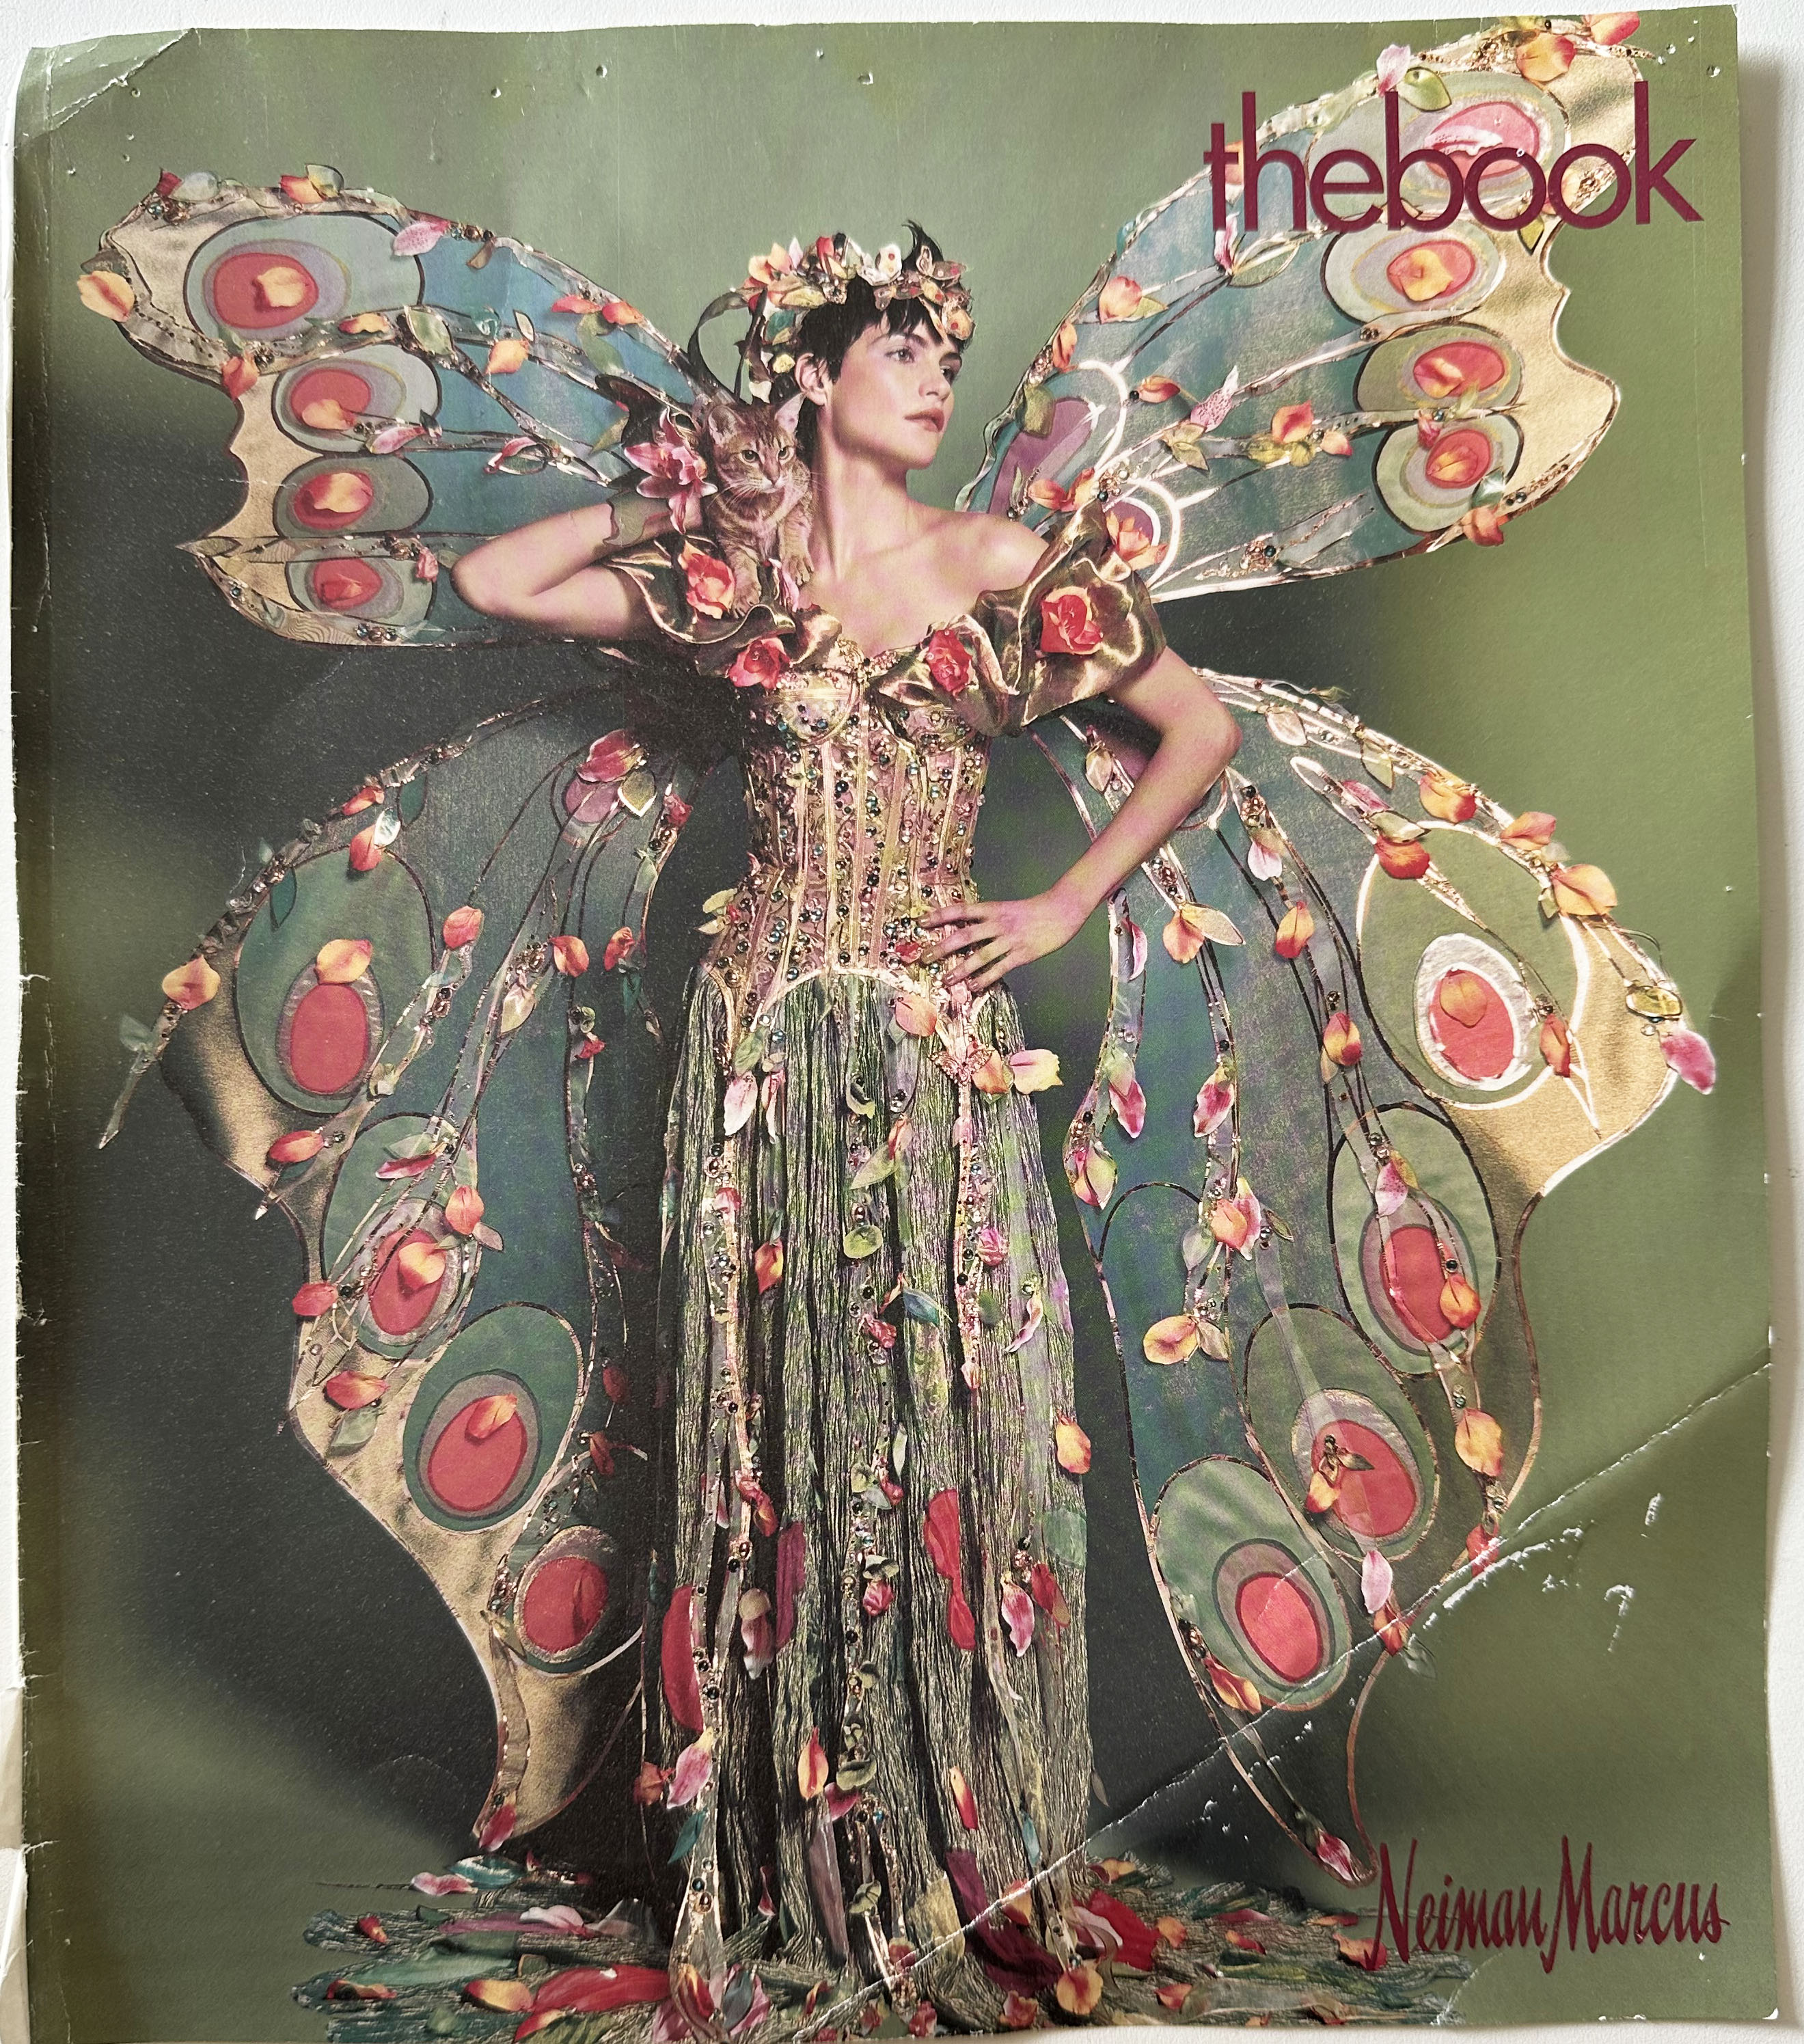
Neiman Marcus put a green butterfly lady on the front cover of "The Book" in May 2003.  I saved it and have had it on my bulletin board ever since.  20 years later and I still love the picture!  This was the inspiration for my second green lady.  


I traced it and had it enlarged to be the same height as my other green lady.  When I traced it, I noticed that there was a cat sitting on the lady's shoulder.  I had never seen it before; or I hadn't remembered seeing it.  I'm going to imagine that it isn't there for my quilt and perhaps fill in the space with flowers.

I started by concentrating on the wings first.  Since I wanted them to be transparent, I pulled out all of the organza in my stash.  I had lots of colors that would work, but needed a large piece for the background of the wings.  So, I headed over to JoAnn Fabrics and found much more than I thought I needed in both organza and ribbons.  I found a luscious lime green organza, a sparkly white net, a sparkly pink organza and a peach floral sheer.  Then I picked up some ribbon in several shades of pink , a couple in bronze and finally some fake flowers.  


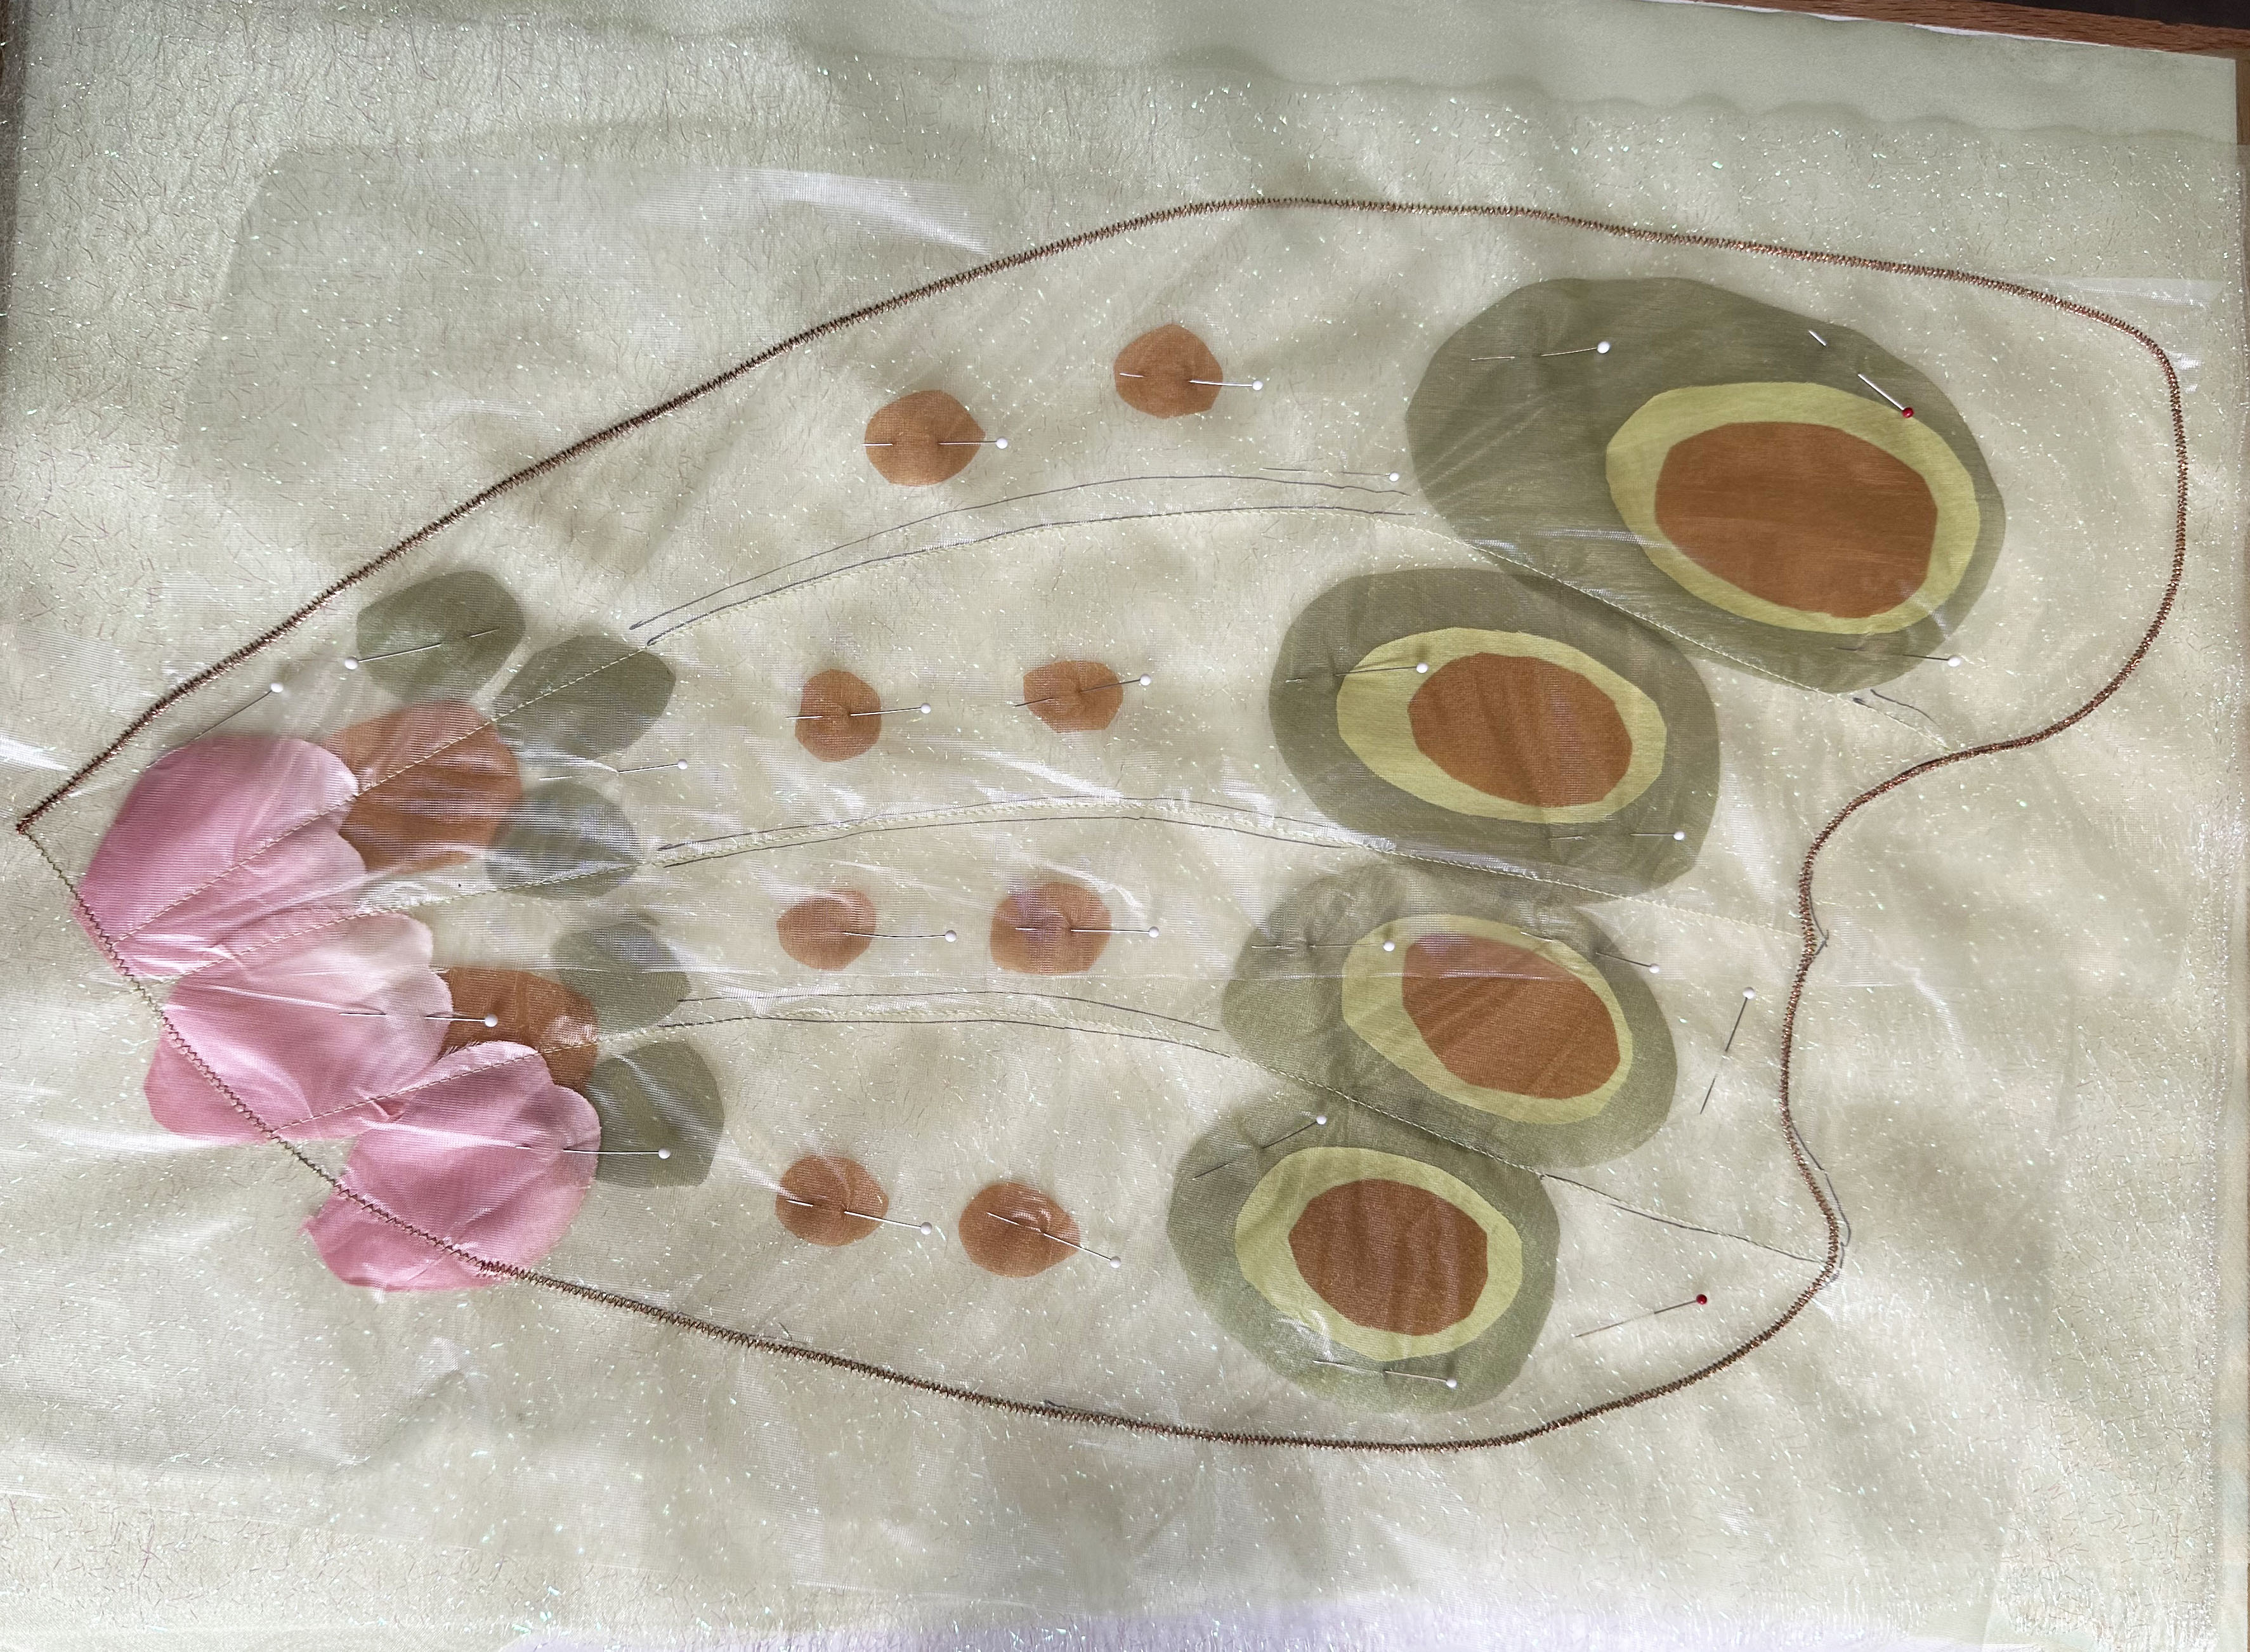
I backed some of the organza with Misty Fuse and then cut it into shapes for the eyes and embellishments on the wings.  This step was done first, using freezer paper templates.


I already had all kinds of stabilizers and decided on two for the wings.  For the bottom layer, I placed OESD Wash Away AquaMesh.  It has enough body to support the organza and stitching, but washes away to leave only the light transparent layers.  The top stabilizer was clear Solvy.  I could trace the design on this top layer, stitch the piece, and wash off the stabilizer and marker.


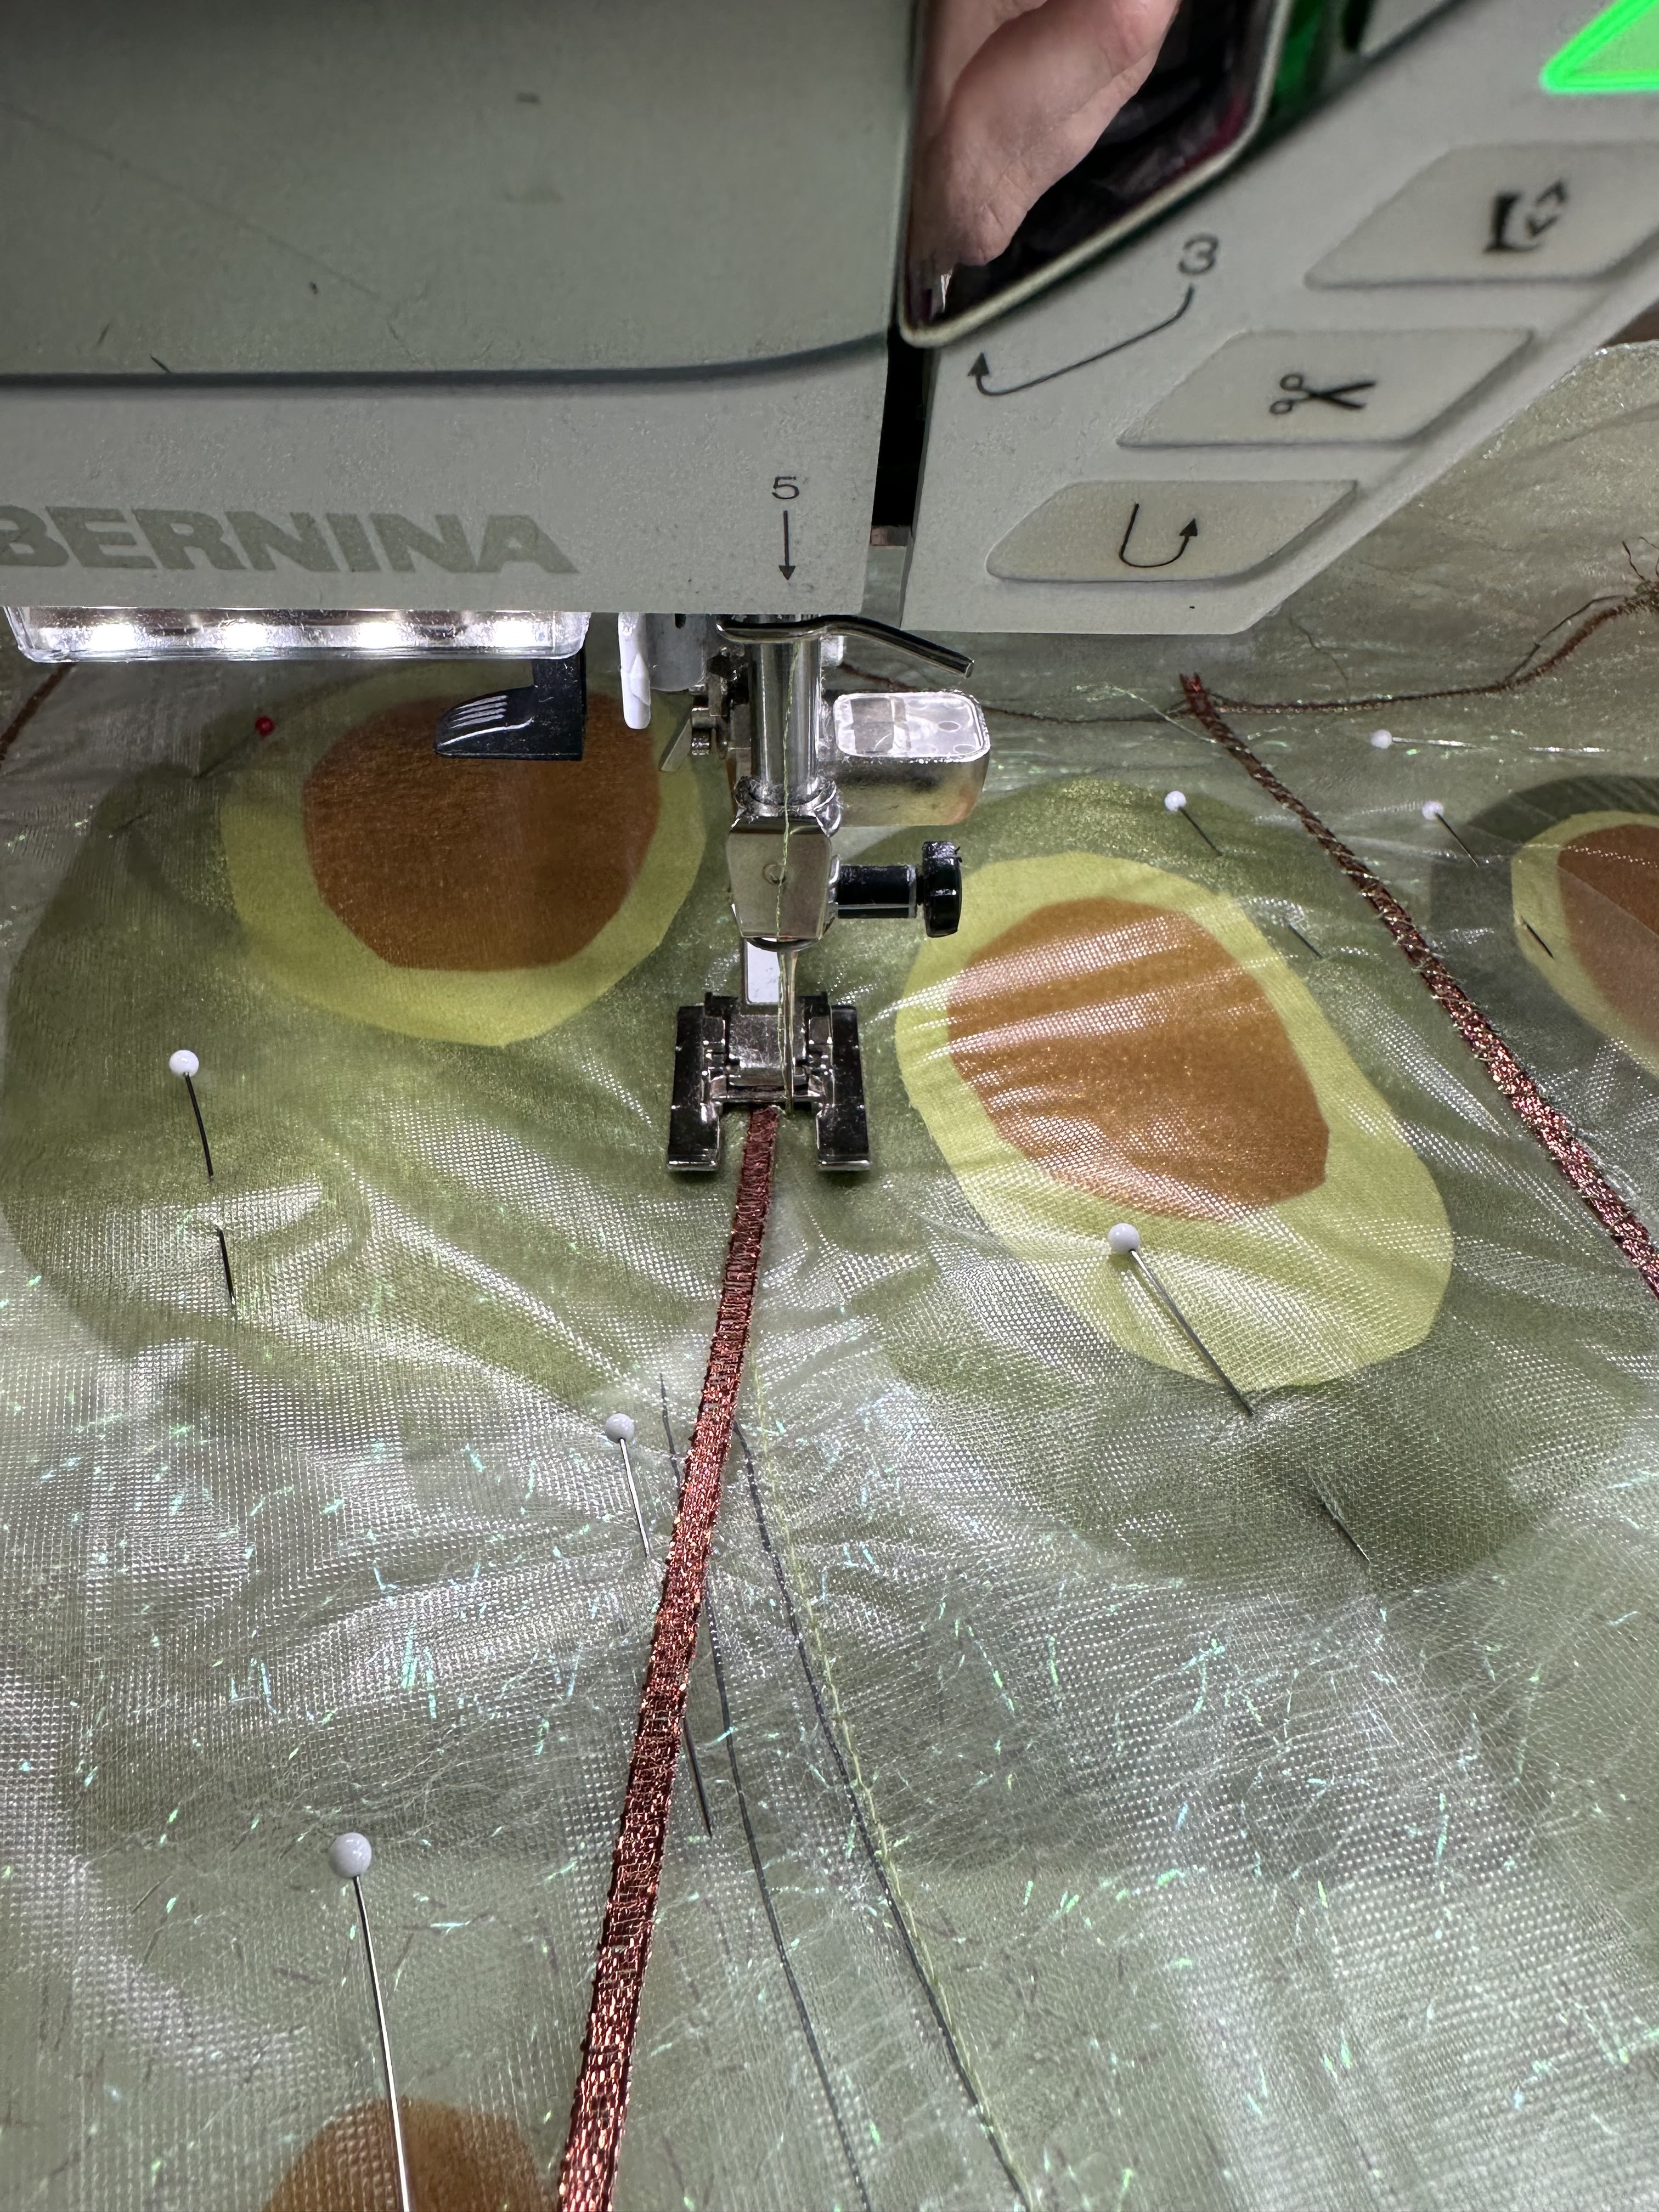
Here is the order of the layers:   AquaMesh; green organza, sparkly white net, eyes and embellishments backed with Misty fFse, and Solvy.  The sandwich was pinned together and stitched down with regular green thread on the outer edges and the lines between the wings.   I used one of the ribbons for the pieces between the ribs of the wings using a 4.5 W x 2.7 L stitch setting.  Zig Zag stitching was done as 2.0 W x 1.0 L for the veins in green sparkly thread, and 3.6 W x .65 L for the outer edges in bronze sparkly thread.  


When all the stitching was done, I trimmed the outer edges, leaving a little extra, then soaked and dried the pieces.  Here is one of the upper wings:


I hope you like it so far!

Monday, August 10, 2020

Lime green 3-D quilt, Final

This is the final blog about the making of the lime green 3-D quilt.

The quilt needed to have lines that enhanced the 3-D effect, and I liked using just plain old gray thread.

Here it is in progress;


And the final quilt.  There's a very skinny pop of lime green piping just inside the border.  It's 51" x 51".


I hope you like it.


Monday, August 3, 2020

Lime Green 3-D quilt, Part Four

This is a continuation of the posts about the making of the 3-D green quilt.

I next turned to the background for the globe.  Since I wanted to use fabric that I already had, I used a gray grunge dot fabric.  I wasn't sure if that would be enough for the background, or if I still needed to add lime green circles.  So, I made a few of the circles and pinned then in place.  Here's the before and after pictures showing the difference.


I decided that I liked the plain background the best.  So, I stitched it down and the top was all ready to quilt.

I hope you agree that it didn't need a ton of lime green circles on the background.

P.S. I know that the original intent was to reduce my lime green fabric stash.  But alas, I had to buy 2 yards MORE in order to do the binding technique, which I'll talk about later.

Monday, July 27, 2020

Lime green 3-D quilt, Part Three

I've written two previous posts about the making of this lime green 3-D quilt.

I continued to cut, paste, and applique the green ovals onto the background strips of this quilt. After I appliqued down all the pieces, I sewed the horizontal strips together, using the same applique method that I used to make the strips.  I could have easily pieced this stop, but I wanted to use applique throughout this quilt.  It's actually much faster than trying to piece the curved sections.


Here is a picture of the top with  the "globe" part of the quilt all sewn together.


And here is the back of this section, showing the start of the removal of the tear away backing.  It's really easy to tear it away because the stitching lines serrated the tear away.  I left the outside pieces in place so that they would form a nice edge when I will applique the globe to the background.


I hope you like it so far!

Monday, July 20, 2020

Lime Green 3-D quilt - Part Two

This is a continuation of a previous post about the making of the lime green 3-D quilt.

After I finished sewing the horizontal rows, I cut out the circles and ovals for the lime green applique.  My favorite technique is machine applique with invisible thread and dissolving foundation.  I like to use Ricky Tims poly stable stuff for the dissolving foundation.  I dabbed on some glue stick at the edges and pressed the dissolving foundation to the back of the fabric pieces.  Then I ran the glue stick around the edges again, and pressed over the edges.  When I was done with the horizontal row, I appliqued the prepared pieces to the background.  The stitch was set to 1.3 mm W x 1.0 mm length on the zig zag setting.


It was much easier to work on this quilt while it was still in strips than to wrestle the entire top under the sewing machine.  Here are some progress pictures:


The first one shows one horizontal row of the applique pieces with the green fabric on top and one row of vertical pieces with the dissolving foundation.  The next picture shows a bit more progress.  (Sorry that the picture is skewed.  It's hard to get a good shot with some of my furniture in the way.  


I think you're probably able to see the lime green quilt emerging.  I hope you like it so far!