Showing posts with label shadow selfie. Show all posts

Monday, April 11, 2022

Shadow Selfie - Peace

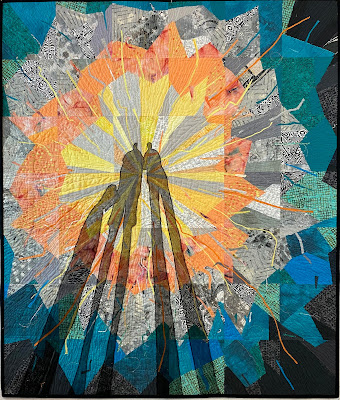
I made another collaged quilt background with a shadow selfie.  My husband said that I needed more current shadow selfies  So, he went out for a walk with me and took this photo of me giving the 'Peace' sign.

I made this quilt the same way as the previous shadow selfie.  I sketched and colored in a design.  Each square was transfered to a 6" piece of muslin.  Fabric was sewn and glued to make the collage.  Then the blocks were sewn together.  Using left-over snippets from the background pieces, and a pile of antique ribbon and bias binding, yarn, and threads, I piled them on top of the completed background.  One layer of black tulle was then placed over the top and it was quilted with several colors of thread.  The final step was to put 2 layers of black tulle underneath the shadow selfie picture and sew around it twice with black thread.


It is 36" W x 42" H.  I think it's timely, with wanting PEACE in the world!  Too much war!

Anyway, I hope you like it.

Monday, March 7, 2022

Shadow Selfie - "Sunshine and Shadows"

This quilt morphed all throughout the process.  

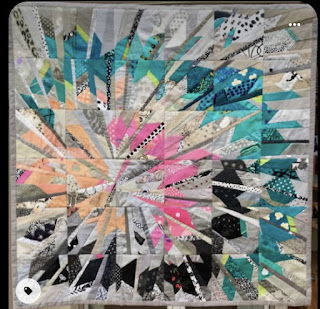
My interest in making a quilt similar to ones made by Ursulu Kern was the inspiration for this quilt.  She makes incredible art quilts and many of them get posted on Pinterest.  Here is the one that I liked the best.


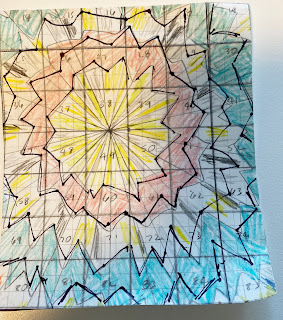
I sketched up the idea, then reduced the size I was willing to make.  Here is the sketch.


The quilt was broken down into 6" blocks to make it easier to handle.  I drew  the general placement of the colors and angles on muslin blocks.  Using basting spray, I sprayed the blocks and collaged the material on top, overlapping were it seemed reasonable.  The 6" blocks were sewn together.  Then I took thread and fabric snippets and placed those on top to enhance the design.  I used gray tulle to cover the quilt top; sandwiched it with Thermore batting and a backing; and quilted it with several colors of thread.  When I was done, that should have been the end of making this quilt.  (I'm pretty sure that Ursula pieces her quilts, but I didn't want to try and do that!).

But it wasn't.  I felt strongly that it needed a focal point.  So, I looked through my collection of shadow selfies and found one with my husband, myself, and our dog.  I traced the picture, had it blown up to size at Rose City Blueprint, and added two layers of black tulle underneath the drawing.  I sewed two rows of black stitches around the edges ad trimmed the tulle.

I think it's really cool now.  My husband named it "Sunshine and Shadows".  It's 36" W x 43" L.


I hope you like it!

Thursday, December 31, 2020

Bryce Canyon Shadow Quilt - Part Two

 This is the second post about the making of the shadow quilt of my husband hiking in Bryce Canyon.

I scanned the photo into Photoshop and changed it to black and white and blurred the photo.  


Then I traced it.  


I remembered a couple of techniques that I liked from some previous art quilts and lessons from teachers.  So, I took out my water colors and water color paper and painted a few background colors.  Then I took out some fabric and had fun making other types of colored background.  Here are the pictures of those things:


It was a ton of fun to just play around with my art supplies while it rained and stayed gloomy outside.  I asked for input from my husband and small quilt group and the consensus was that they liked the diagonal painting with orange, blue and purple.  So I drew the diagonal lines on the tracing and that will be where the colors will change. I also liked some of the splotchy areas on the painted fabric.  I plant to make paper fabric and paint that with the splotchy effect and use that for the background along with black, and dark blue and dark purple.  Here's hoping that it all comes together.

I hope you have ways to entertain yourself when you can't go and see friends or go outside because of the weather.  And especially when you don't watch the election returns on TV!

Monday, March 9, 2020

Sewing together 9 shadow selfies

I made 9 small (12" x 12") quilts that were all shadow selfies as a series.  I previously wrote blogs about all of these little pieces.  They were exhibited at my solo show in October 2018, but they haven't been entered in the Clark County Quilters show yet.


I was inspired to group them together into one quilt after I saw a grouping put together by Lynn Czaban of the portrait quilts she made of the Vagabonds.  She used zippers and tabs to sew hers together.  Here's a photo of that quilt:


Although the zippers were an unexpected and fun way to sew some of them together, I'm just not as talented as Lynn is, so I decided on adding tabs only. Here is my sketch of the idea:


I used black fabric (with a stabilizer on the back) and sewed with decorative stitches and couched yarn and trimmings on top.  


Here is what that looked like before I cut it into tabs.


After I cut the strips into the tabs, I placed them on plain black fabric and satin stitched (zig zagged) around all the edges.  I used a machine setting of 3.4 mm width and .4 length.  


To keep the corners from fraying, I added a dot of  fray check, let it dry, then cut out the tabs.


I placed the tabs between the little quilts and stitched right through the binding and the tabs.  I like the effect that this has given the grouping.


I hope you like it and will try grouping smaller pieces into a larger one for exhibit.  

OH, and P.S.  It costs $10 to enter a quilt into our show.  Sewing these 9 quilts together is going to save me $80!

Monday, December 17, 2018

Shadow Selfie #9 - Fall Strolling

This is the 9th quilt that I've made in the shadow selfie series.

We took a nice shadow picture while walking in Walla Walla, WA in September.   It called out to use an orange background to both represent fall and to complete the color effect of the series.  I bought a nice new orange batik and cut it into wedges for the background.

I wanted to try using a different technique than the others in the series, so I placed the black fabric on the background, placed the picture on top of that, and triple stitched around the edges.  Here it is pinned in place:


Here I'm showing the stitching and the settings on the triple stitch.


I used 2.4 stitch length on the long straight lines.


Then I reduced the stitch length to 1.5 to go around the smaller curvy edges.


Then, I cut off the paper, and removed the excess black fabric.  And since there was a lot of fraying at the edges, I zig zag stitched around the outside edges.

I wanted to add some fall leaves at the bottom to make it feel like we were strolling through the downed fall leaves.  I got the idea to use some of my fancy fabrics, including lame and organza and make leaves out of them.  Here is a picture of the sandwich that I made.  The layers are dissolving foundation, organza, thread (if used), organza, and Solvy.  I used a blue dissolving marking pen for the first set, but it was too hard to see.  On the later sets of leaves, I marked with a permanent marker on the Solvy.


 I zig zag stitched around the edges with a .4 stitch length and 1.4 stitch width. 


Then I dissolved all of the disappearing products in warm water in the sink, laid the pieces flat to dry, and cut them out.  Here's what the leaves looked like after they were cut out.


And here is the finished quilt. The piece is 12" x 12" and has traditional black binding to go along with the rest of the series.

Shadow Selfie Series #9, Fall Strolling by Joanne Adams Roth
I hope you like it.  And I hope you have liked seeing this series of 9 Shadow Selfie Quilts.


Monday, December 10, 2018

Shadow Selfie #8 - Anniversary

This is the 8th quilt that I've made in the shadow selfie series.

We took a nice shadow picture on our anniversary this year while touring the Oregon Gardens in Silverton, OR.   It called out to me to use a red background and add some hearts.  I had a piece of red ombre fabric in my stash and quilted around my picture with black thread.  After I removed the paper, I used Derwent Inktense pencils and fabric medium to paint the shadow.  After I quilted the piece, I used Fabrico markers to fill in the hearts.

The piece is 12" x 12" and has traditional black binding to go along with the rest of the series.

Shadow Selfie #8 - Anniversary by Joanne Adams Roth


I hope you like it!

Monday, October 22, 2018

Shadow Selfie #7 - Pump It

This is the 7th quilt in the Shadow Selfie series.  I wrote blogs about quilts 1-6 previously.

I got the idea for this quilt from a picture taken on a bike ride.  The background and the shadow are hand painted with fabric acrylic paints onto PFD (Prepared For Dying) fabric.  It was heat set after the paint dried.  I learned this technique from Susan Brubaker Knapp, an excellent teacher.

I picked green and shades of yellow green for the background because, if you've been reading my blogs, you know that lime green is my favorite color.  And I love to ride bicycles.  The shadow selfie series is becoming a bit of a visual journal about my activities.

So here it is:

Shadow Selfie #7, Pump It, by Joanne Adams Roth 2018


I hope you like it.

Monday, October 1, 2018

Shadow Selfie #6 - Painterly wave

This is the 6th quilt in the Shadow Selfie series.  I wrote blogs about quilts 1-5 previously.

I got the idea for this quilt from a picture taken on a walk.  The background is made of muslin covered with tissue paper, then painted while it was wet.  It was the perfect background for a shadow made of tulle, so that you could see the painted fabric through the shadow.

I pinned 2 layers of black tulle onto the background, then placed the paper with the shadow printed on it on top.  Then I sewed over the outline twice with black thread.  This both pierced the paper pattern and gave a nice heavy line as an outline for the shadow.  The final steps were to tear away the paper, then cut away the excess tulle.  And voile, there's the shadow selfie on the painted background.

Shadow Selfie #6, The Painterly Wave" by Joanne Adams Roth


I hope you like it.

Monday, September 24, 2018

Shadow Selfie #5 - The Lily Fields

This is my 5th quilt in the shadow selfie series.   I wrote blogs about 1-4 previously.

I got the idea for this little quilt on a hike through the Camas Lily Fields in April.  This is a hike that I love to take every year.  As you step up onto the plateau, you gasp as you discover the meadows covered as far as you can see with blooming Camasia lilies interspersed with the little pink sea blush.  And lime green mossy rocks.  So amazing!  The shadow is of a friend, a granddaughter, and me on the 2nd hike I took in a 5 day period.


I wanted to try my hand at a mosaic shadow selfie, and this seemed like just the right one.  I tried to use mostly batik fabrics for this quilt and cut them into 3/8" squares.  It is a technique taught by Cheryl Lynch, whom I saw on The Quilt Show.

Here is my sketch which turned into the pattern.


And here is the little quilt.

Shadow Selfie #5 - The Lily Fields by Joanne Adams Roth


I hope you like it.


Monday, September 17, 2018

Shadow Selfie #4 - Giddy Up

This is the 4th quilt in the Shadow Selfie series.  I wrote blogs previously about quilts 1-3.

Many time when I take a shadow selfie, I enlist my husband in the picture too.  He's not quite as enthusiastic about getting into the groove as I am, but he will pose when we're on a trip.  This picture was taken on one of those trips.  We live in the Pacific Northwest, where rodeos abound around the 4th of July.  There are so many of them they call it "Cowboy Christmas".  We don our cowboy hats and western clothes and head out for a good old fashioned rodeo.   Hence the name "Giddy Up".


I found a perfect background fabric that looked like barbed wire to me.  Do you think it looks like that too?


I drew up the pattern and made freezer paper templates, which I then ironed onto the background.   I numbered each piece and made match marks between the pieces so that I could sew them back together, leaving generous allowances around the edges.  That way, I knew I would be able to trim the piece to size after sewing.  If you are working with odd angles, be sure to leave this extra allowance too.


I placed the pieces along the grain-line of the fabric and after pressing the freezer paper down, I cut out all the pieces, leaving the freezer paper in place so that I would know which piece was what.


After sewing the background togehter, I fused the shadows in place, appliqued them with invisible smoky thread and quilted the piece.

Shadow Selfie #4 - Giddy Up by Joanne Adams Roth


I hope you like it.


Monday, September 10, 2018

Shadow Selfie #3 - Bubbleishous

This is the 3rd quilt in the shadow selfie series.  I wrote blogs about the previous 2 quilts.  The shadow selfie is from a picture I took of myself on a walk early in the morning to get that long leggy look.  I positioned myself to make it look like I was holding a bouquet of daffodils.  Well, actually, they look like they're coming out of my belly button, but you get the gist.


I found a wonderful new-to-me ombre fabric at a quilt show in Portland.  I knew that I was making the shadow selfie series when I bought it, and it was put into the quilt within a week.  I loved the bubbleishous (made up word) feel of the fabric.  Doesn't it just make you happy?

"Shadow Selfie #3 - Bubbleishous" by Joanne Adams Roth 2018

The quilting was done with circular templates and free form pebbles.  It complemented the fabric really well, and is hard to see unless you looking at the quilt in person.  One of the things I like about going to quilt shows is when you get drawn into a quilt to look closer.  I think this one will make people do that. (p.s. My sister days my butt is not that big!)

I hope you like it.

Monday, September 3, 2018

Shadow Selfie #2 - The Adams Stance

This is the second quilt in my shadow selfie series.  I wrote a blog about the first one previously.

This quilt started with shadow selfie photo that I had taken on a walk.  In April, I took a picture of a field of blooming daisies.  I loved the idea of putting this shadow selfie onto the field of flowers.   So those 2 photos became the inspiration for this quilt.


I started with a blue ombre fabric as the background.  The shadow selfie was appliqued, then the piece was quilted.  White, pink and yellow embroidery threads were used to embroider the lazy daisies on the bottom of the quilt.

"Shadow Selfie #2 - The Adams Stance" by Joanne Adams Roth 2018

I was tickled pink when our 5 year old granddaughter noticed right away that it was a shadow!  She drew a picture of the quilt.  Don't you love it?


I named this quilt, "The Adams Stance" because many of us in the Adams family (no...not the show, my real family) inherited a quirky knee bend from my father.  There are so many pictures of him like this, and of me, and of my son.  It's really quite funny because we don't know we're doing it.  Then we see the pictures and have a great laugh.  Do you have family characteristics that show up in pictures too?   Like perhaps squinty eyes?  And you know who you are, right?

I hope you like it.


Monday, August 13, 2018

Shadow Selfie #1

I've been taking shadow selfies for about 4 years now.  I don't know why I like them, but I do.  Perhaps it's because I don't care if I have make up on, what I'm wearing, or how many wrinkles are on my face.  My shadow always looks good.  Since I post so many of the shadow selfies, many of my Facebook friends do it now too!  I think they are having as much fun as I am.  I've taken them at rodeos, on hikes, on bike rides, and on many of my daily walks.  I especially like the ones taken early in the morning, when my shadow is long and leggy.

Sometimes, when you're drawn to something, you really can't put your finger on the reason.  Artists get their inspirations from many sources, and I'm no exception.  Are we getting a message from the universe that we should pay attention to?  What do these pictures say about me?

Since I like to turn pictures into art quilts, I decided that a series of my shadow selfies would be really fun.  I decided to make them 12" x 12" and to try to make 10 to start with.  All of them will have black shadows and black binding.  But the rest will be whatever inspiration strikes me at the moment.

Shadow selfie #1 started when I picked one of the shadow selfies for this quilt.  There was a really great batik that I had with ombre dying in it plus some strong horizontal lines.  So with these 2 things as my inspiration, I sketched up a design that would be quick and that would convey my photo.


I traced the wedges and put them on top of the fabric, matching up some of the horizontal lines.


These were pieced, the shadow was appliqued to the background, and it was simply quilted with teal thread.
Shadow Selfie #1 by Joanne Adams Roth  March, 2018

I hope you like it!  And have fun taking shadow selfies too!