Monday, September 25, 2023

Inserting skinny lines perpendicular to each other

This is the 4th post about inserting skinny lines into improv blocks.

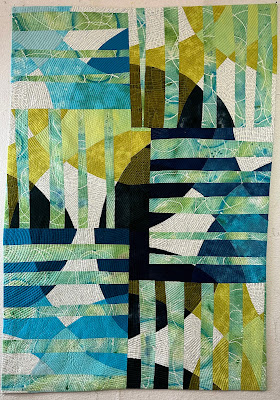
This post is about inserting skinny lines across a plain block, then cutting through it perpendicularly and adding more inserts.  All of the insert pieces were cut at 3/4" wide to start with.

The first block was done by slicing across the block and inserting a strip of gold fabric, with a reveal of slightly less than 1/4".  The block was then cut across in 2 areas and lime green strips of fabric were inserted.  This method slightly offsets the first line in the piece, which looks fine for an improv block.  I suppose you could get fussy and try to line up the pieces, but then your improv juices get turned off.


The second block was cut in half and the sides were then also cut in half.  Gold inserts were put into the halved halves (revealing 1/8" strips of gold), and then the two sides were sewn together with a slightly larger reveal (revealing 1/4" strips of gold).  This method preserves the straightness of the first improv insert.

I hope you try these techniques in some of your improv blocks.

Friday, September 22, 2023

Inserting skinny lines into wavy improv landscape type pieces

This is the 3rd post about inserting skinny lines into improv pieces.  These blocks were made with a wavy improv technique that was first taught to me by Jean Wells.

I started with 5 different fabrics to make two pieces.  Two were in shades of lime green;  one was a hand dyed army beige; one was the gold fabric, and the blue was from Marcia Derse's collection.


The first step was to cut the bottom and the next piece with the curved shape.  This was done by laying them on top of each other and cutting the curvy improv line.  After removing the pieces underneath, the pieces were sewn right sides together with a 1/8" seam and 2.0 stitch length.


The piece was pressed and the 3/4" skinny gold line was attached.


This was pressed and trimmed and the next piece was cut to match the curve.


It was sewn, pressed and trimmed, then the next piece was cut to match the curvy seam.


That piece was trimmed and the final piece was trimmed and sewn, then the whole piece was pressed and starched.


Here is the final piece, which will be trimmed when it gets added to the quilt.


The second block was made in the same manner with the same fabrics.

I hope you like this wavy improv way of making blocks with skinny inserts.

Monday, September 18, 2023

Inserting skinny lines - square in a square

I was asked to do a little workshop on how to insert skinny lines into quilts.  I've done a bit of it before, and wanted to include both straight line inserts and curved inserts and both of varying widths.  I took inspiration from Weeks Ringle and Bill Kerr, Irene Roderick, Cindy Grisdela, and Jean Wells, among others.  It seems like the super skinny lines are showing up more often in quilt shows and  that intrigued me.

I showed skinny lines inserted into curved pieces that finished about 1/8" on a previous blog.  These will be  about 1/4" inserted into a square in a square block.  I cut a wonky rectangle to start with.  To this, I sewed the 3/4" strips of gold with a 1/8" seam, pressed, and trimmed them to 1/2" from the sewn line.  I used strips about 3" wide from the lime green fabric and sewed those in the next row with 1/4" seam allowance.  


I trimmed them wonky after they were pressed, and to be 1" to 2" wide.  


The process continued with more 3/4" strips of gold, and one more row of lime green.  On one side, I inserted a strip of gold.  The piece ended up about 7-1/2" x 7-1/2", with one side wonky.  I may or may not trim this when it gets sewn into the quilt.  


I hope this helps sew skinny lines into some of your blocks.


Friday, September 15, 2023

Challenge piece for the Mod Quilt Squad - Lime Twist

The newest challenge for the mod squad group was announced.  The theme is "Lime Twist".  The pieces must have lime green in them, some gold, be improv pieced, be Kintsugi inspired, and be 24" W x 48-60" H.  I pulled out blue fabrics from the Marcia Derse collection, some dyed fabric, lime green and other shades of green fabric, and two gold fabrics for the color scheme that I envisioned.


I didn't start with a design, just the black lines of the space to fill on my design board.


Then I pulled out all of my books and blogs about making skinny lines and started making improv pieces.  This is a skinny line curved technique that I found in Irene Roderick's book.  I started with two pieces of 8" x 8" fabric, and 3/4" wide strips of the gold fabric.  It seems counterintuitive that you use straight pieces for the inset curved parts, but it works!  Well, with a little steam and starch and very skinny seams.  First, I free hand cut the first curve with both the blue and green fabrics stacked right side up.


Then, I took the 3/4" gold fabric and using an 1/8" seam, sewed this to the first curved piece.


This was pressed away from the skinny strip.  I trimmed 1/4" off the skinny strip and using a 1/8" seam and LINING UP THE PREVIOUS SEAM LINE, sewed the outside piece to the skinny strip.


I pressed the seam away from the skinny strip again.  Note that the sides won't match up anymore.


I decided that one more slice was needed, so I followed the same steps as with the first insert.  This time, though, I left a slightly larger piece of the gold, maybe a 3/16" width away from the first stitching.  After it was pressed, I trimmed the pieces to be even on the sides.  I ended up with two blocks with two inserts, one ended up being 6-1/2" x 7-1/2" and the other one was 7-1/4" x 8".   So, for future reference, I'll know that the final block is indeterminate until after pressing and trimming!  And that centering the pieces gives a little bit larger end piece.


That's all for now.  I'm going to try to write a couple of blogs about making skinny inserts so that I can share the techniques with my Mod Quilt Squad.

I hope you like the pieces so far!

Monday, September 11, 2023

Transferring and painting birds onto an art quilt

I've used a technique to transfer and paint birds onto art quilts a few times and thought it might be helpful to share it, step by step.

I have a few sketches and pictures of birds in my sketch book.  When I want to add one to an art quilt, I trace the bird onto tracing paper with a fine tip permanent marker.  This tracing is pinned to the art quilt.


I quilt through the paper using a dark thread and short stitch length, which is done by slowly moving the quilt while using a fairly rapid speed and the darning foot (or free motion foot). 


The paper is then ripped off.  If you use thin tracing paper, this comes off very easily.


I use  Inktense pencils and a small amount of clear aloe vera gel and paint the area inside the thread.  When it dries, it is permanent.


I hope you can use this technique on some of your quilts.  


Friday, September 8, 2023

Green Lady #3 - part 4 - FINAL - Dressed Up Gardener

This is a continuation of 3 previous posts about the making of Green Lady #3.

I used several kinds and colors of thread during the quilting phase.  Most of these threads got tried in the longarm; some worked and some didn't.  So some of them were quilted on my domestic machine.  And some got added by hand.


 One thing that I learned is that it is VERY DIFFICULT to hand embroider through fabric that has been attached with Steam-A- Seam.  Sticky and tough.  Ugh.  Anyway, I persevered and here is the final quilt.  It measures 36" W x 50.5" H.  

I named it "Dressed Up Gardener".  


I hope you like it!


Monday, September 4, 2023

Green Lady #3 - part 3

This is a continuation of 2 previous posts about the making of Green Lady #3.

The skirt was made with a base of dark green fabric that was enhanced with antique lace and strips of organza.    

I found a couple of pictures of garden boots on the internet, and used them for the patterns for the boots and legs.  Then, I started adding the floral components to the background.  I used pictures from my garden to inspire some of the foliage and used the fabric motifs for some others.  The fabric was backed with fusible and cut out free hand.  I placed them all; moved a few around; and when I got a layout that I liked, I pinned the lady on top.  After all of the components were made, they were either fused or appliqued to the background.  Here is the piece with all of the components in place.


Next up will be the quilting.  I hope you like it so far!


Monday, August 28, 2023

Carnival Flower - Final - "Carnival Vibrancy"

I had my quilt top custom quilted by C squared quilting and Corrie Coldwell did an amazing job!  I love it so much!  She posted pictures along the way on Instagram which kept me on the edge of my seat.  She bought thread to match the fabric, changed colors, and spent a lot of time doing the custom quilting.  I was able to pick it up a few weeks ago, and the binding is all done.  It's 80" x 80".  I've named it Carnival Vibrancy.

Here it is:


I just love it and I hope you do too!

Monday, August 21, 2023

Ice Dying Workshop

I went to an ice dying workshop for the Clark County Quilters recently.  It was my second time taking the class taught by Ann Robertson, who is an expert on fabric dying.  She is so knowledgeable with years of experience in dying fabric.  This time, she showed us some different techniques, like dying at an angle inside of a piece of gutter, folding and crimping, using rubber bands and waxed twine.  Her samples were jaw dropping!

Since I had done a little ice dying, I thought that I would try new things.  I started with 4 pieces of white fabric at home and put them into a vat of turquoise dye.  They soaked for about 2 hours before they hit the ice dying process.  The other 4 pieces of fabric were prepared and dried by Ann, so they were all ready to into the ice dying containers.  

For the turquoise fabric, I squeezed out the excess dye, scrunched the fabric into the baskets, then added ice on top.  I added dye powder in lime pop, chartreuse, gunmetal, and imperial purple in various combinations.  Then I sprinkled a bit more soda ash on top, and added another layer of ice on top of that.   Ann let us know that they soda ash soak normally used is 1 c. soda ash to 1 gallon of water.  for ice dying, she uses 2 c. soda ash to 1 gallon of water.  That's why she suggested sprinkling more soda ash on top of the immersion dyed fabric.   Here are the results of those 4 pieces.


With the white pieces, I put marbles in one and secured them with rubber bands.  In another one I twisted a few spots and secured those with rubber bands.  On another one, I twisted in a couple of spots, and tied it in two places with waxed twine.  The final one was scrunched.  I added the same dye powders as above, and also Cerulean blue.  Frankly, I can't tell you which piece is what, but here are the results.


I really like how they turned out.

I hope you like them too!


Monday, August 14, 2023

Green Lady #3 - part 2

This is a continuation of a previous post about the making of Green Lady #3, the third in my series of green ladies with a garden based theme.

I made the background with a couple of fabrics that I had on hand.  I intended to add a lot of stuff on top of these layers, but left that until later.


The dress and jacket were the next items that I made.  I traced my pattern onto freezer paper.  I auditioned fabric that I had received with an Asian theme to honor the model in the original picture.  The only one that stuck was the gold used for the dress.  My thinking was that since I had hidden her eyes, the model no longer looked Asian, and therefore, I was free to choose other fabrics from my stash.  

The jacket was made from a gold-flecked green fabric.  I topped it with wool roving, thread, snippets of fabric, Angelina fibers, dyed cheesecloth, and light green tulle.  This was stitched down with a green metallic thread.  After it was stitched, I laid the freezer paper pattern on top and sewed through the freezer paper on the stitching/outside line.  


Then, using a glue pen, I glued under the edges that would be on the outside.  The edges were pressed underneath a non-stick applique sheet so that the glue and the freezer paper wouldn't get stuck to the iron.


When all the pieces were done, I started building the dress, matching up the lines on the freezer paper pattern.


Those edges later were stitched with an invisible thread and a zig-zag stitch.

I hope you like it so far!