Monday, May 29, 2023

Carnival Flower - Part Four

This is a continuation of three previous posts about the making of Carnival Flower.  The fourth class covered the pieces that were next from the outside in.  I thought the last section had skinny long points, but this one was even harder! I went ahead and started sewing the top together (starting from the outside in) so that I would get some of it done while continuing on with the classes.  (Plus, the teacher told me too!).

Here is the picture with these pieces on the design board.  


I still like it and hope you do too!  Only 2 more classes left to go.

Monday, May 22, 2023

Green Butterfly Lady - Part Four

This is a continuation of 3 previous posts about the making of the Green Butterfly Lady.  I tackled the dress next and did it in three parts.  The dress top and bottom were worked in torn strips of green fabric, dyed cheesecloth, organza strips, ribbon and a few of the leaves and flowers.  The whole thing was covered with green tulle, backed with light green fabric,  and lightly quilted with 4 shades of green thread.   The corset was made with organza and ribbon.  It was backed with orange fabric and covered with tulle, then lightly stitched with bronze thread.  The three pieces were pinned to the design wall to see if they were going to work.  And they did.


Then I turned the edges under and stitched the pieces together with a zig zag stitch.  

As I turned and tossed in the middle of the night, I remembered that I had a light green fabric that might work for the background.  I didn't want to lose the transparency of the wings with a darker color.  So, I  pinned the pieces to the background to test it out.  I placed a few of the loose flowers and leaves on top too.  Here is the picture off the components as they might appear on the final quilt. 


Nope, it was too pale.  I did a little shopping and found the perfect fabric.  It was Moda Ombre Fairy dust metallic, stock #10871.  I could have used just one length and had the lightest ombre in the middle, but I decided to put a seam in it and offset the light part to the right.  Now, here is the butterfly lady on that backing.  Just right! 


Stay tuned to see what the next steps were.  

Thursday, May 18, 2023

"Hootie" published in bird book to be available on Amazon


"Hootie”, my owl quilt is featured in Stitched Journeys with Birds: Inspiration to Let Your Creativity Take Flight. This collection – brought together by Martha Sielman, executive director of Studio Art Quilt Associates (SAQA) – features gorgeous images of avian art made with fabric and other materials. www.amazon.com

Monday, May 15, 2023

Green Butterfly Lady - Part Three

This is a continuation of two previous posts about the making of the Green Butterfly Lady.  I started making flowers and leaves out of some of the fabric that I bought and some that was in my stash.  When making the flowers from the organza and organza ribbon, I placed two layers of fabric between two layers of Solvy, drew the design with permanent marker, and stitched around the edges with a tight zig-zag (2 stitch width; .5 stitch length).  


After they were stitched, they were cut out and soaked in warm water to dissolve the stabilizer.  Here's the pile of the flowers and leaves.  


And here is the face with the flowers approximately where they will be placed.  


I think it's turning out OK so far.  I hope you think so too!

Monday, May 8, 2023

Green Butterfly Lady - Part Two

This is a continuation of a previous post about the making of the Green Butterfly Lady. I previously showed one of the top wings, and now I'm going to show you a picture of the bottom wings.  They were much more difficult because of the size, but the steps were the same as for the top wings.


I really don't like to do faces and hands, but this quilt called for me to do both (yuk).  I thought that I'd better tackle them next and get that step behind me.   I traced the pieces of the face onto Steam-A-Seam, applied them to the various colors of fabric, and adhered them together.  This is what the face and arms looked like after I added colored pencil.


I hope it still looks like its going in the right direction.  

Monday, May 1, 2023

Green Butterfly Lady - Part One

After making the Northwest Garden Lady art quilt, I decided to make 2 more green lady art quilts.  I LOVE LIME GREEN!  If you've been reading my blog, you already know this about me.  I have green doo-dads all over my studio, and frankly, all over the house.  I collect green depression glass, have a lime green stand mixer, lime green dishes, lime green clothes, lime green front door, lime green patio furniture, plus a lot of other stuff.  I just bought a lime green rain coat from Pendleton!  I am just so happy and delighted when I surround myself with lime green.

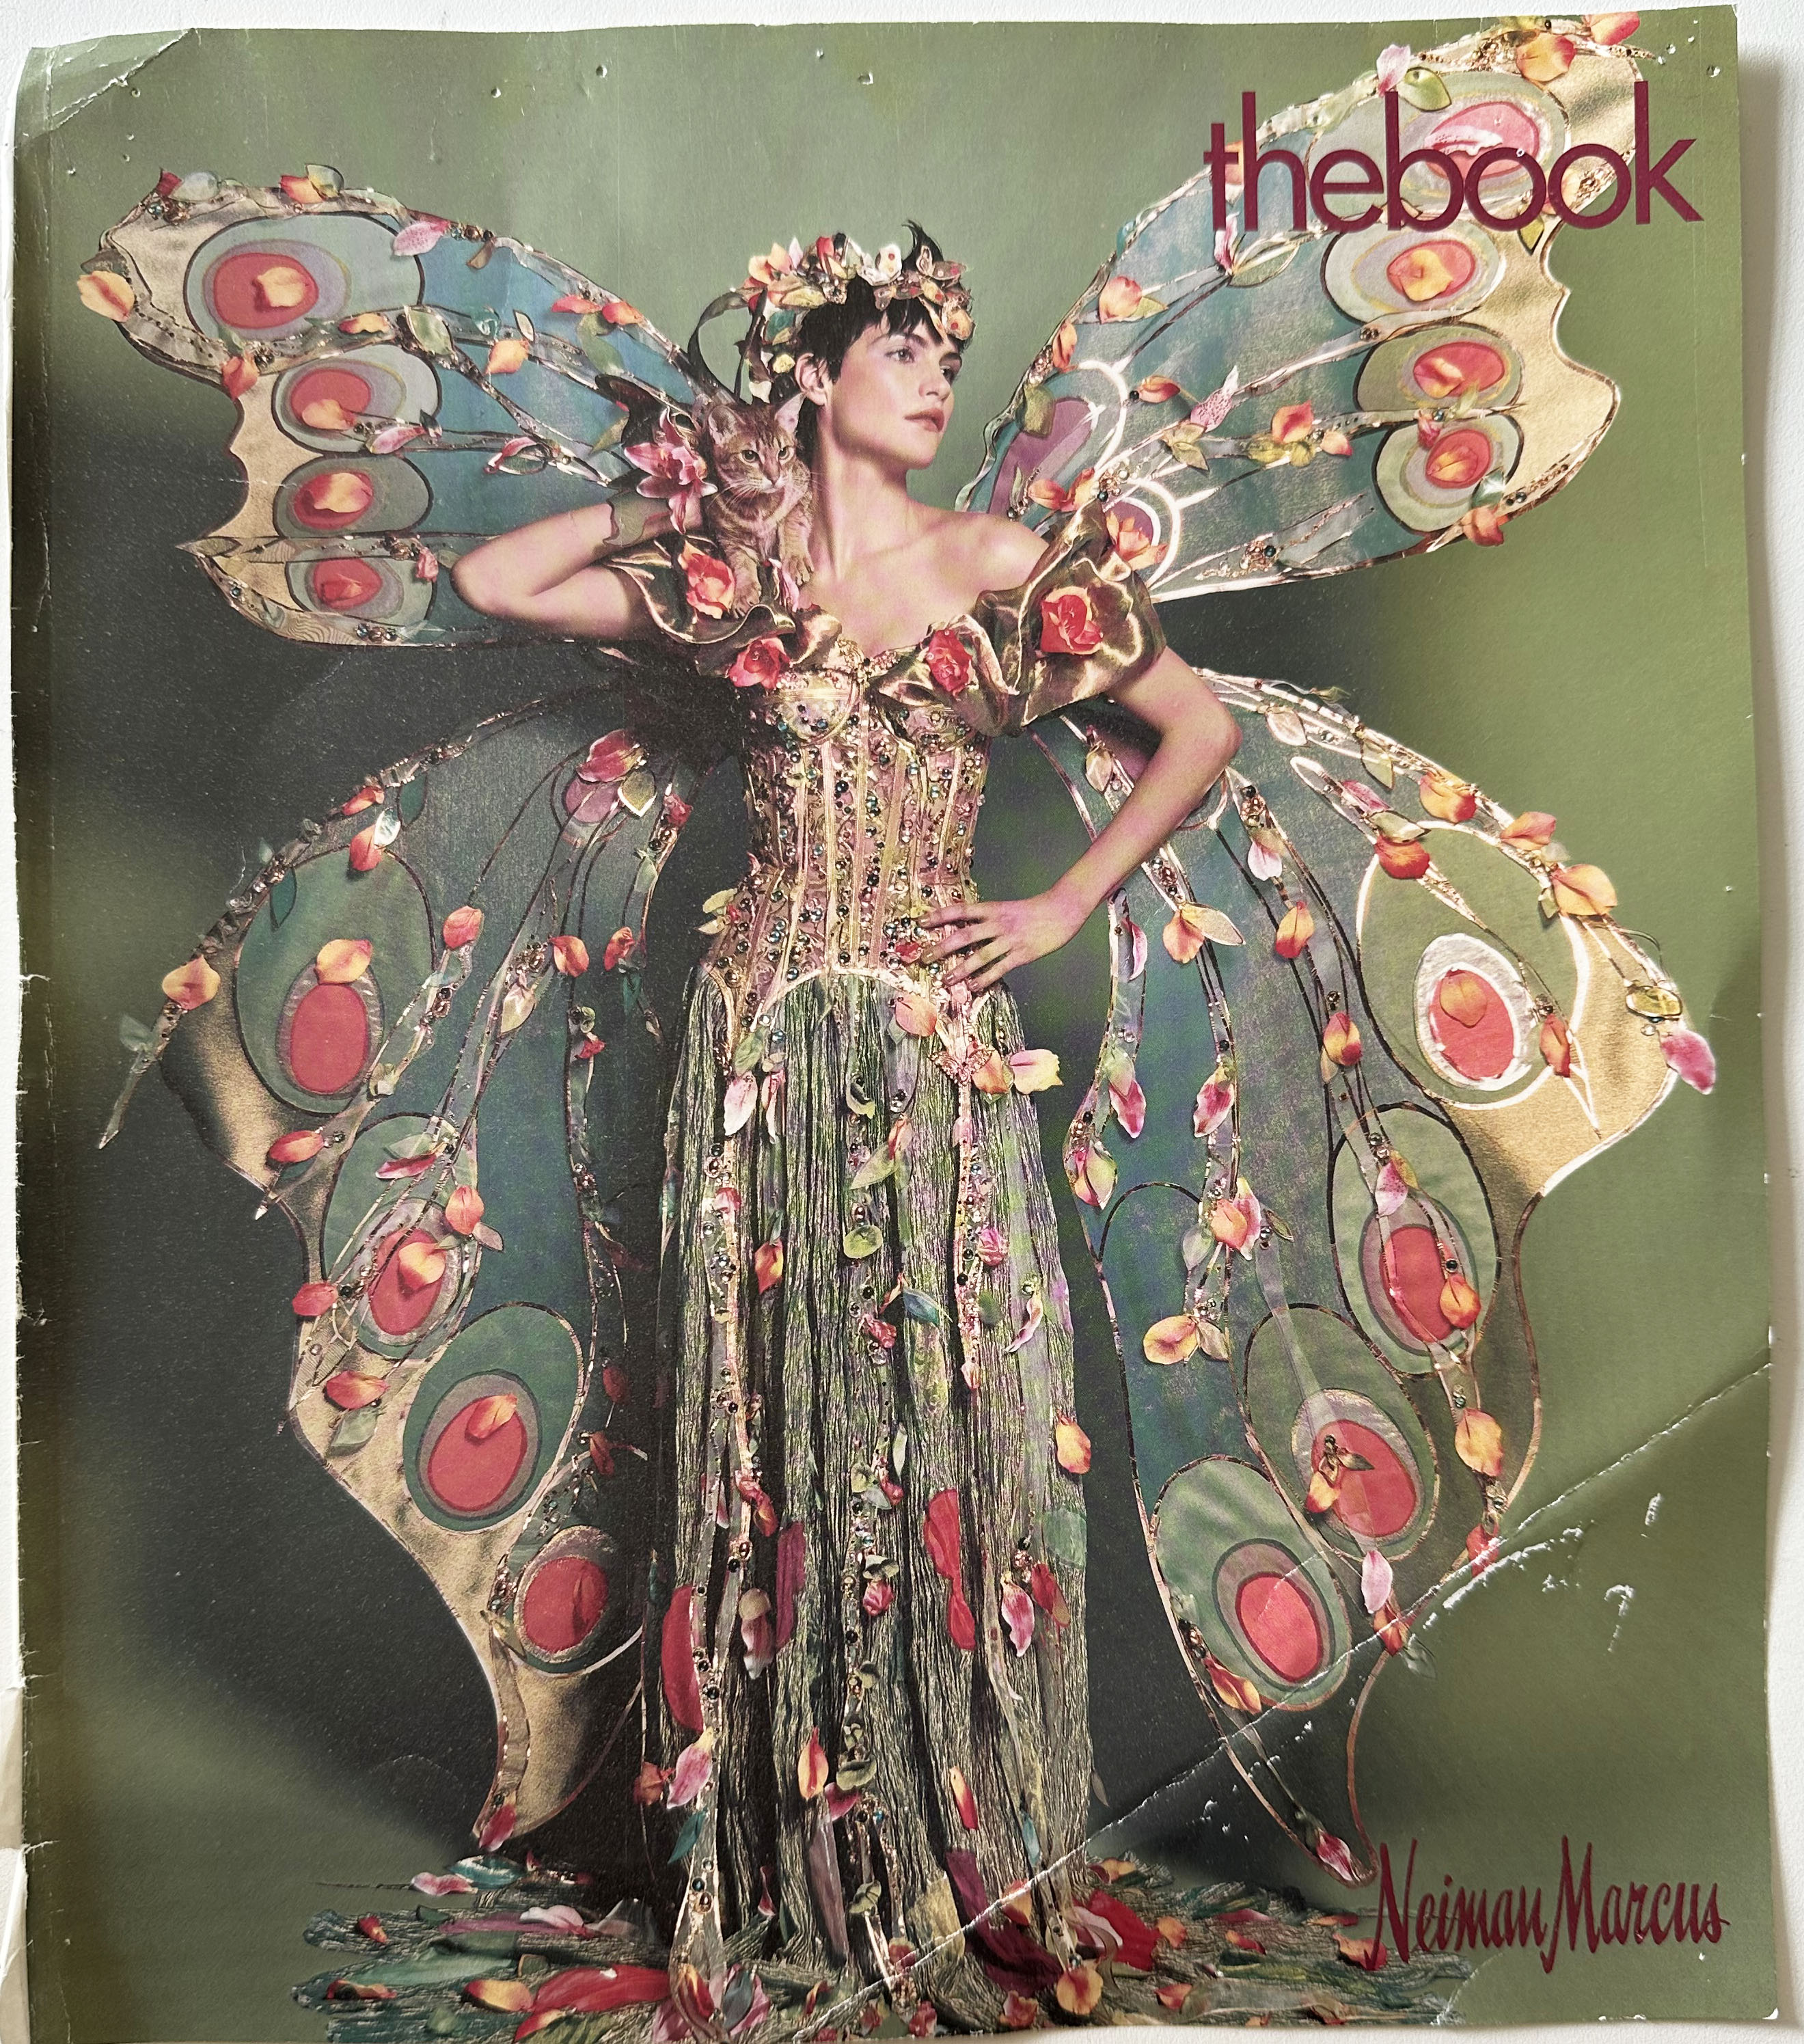
Neiman Marcus put a green butterfly lady on the front cover of "The Book" in May 2003.  I saved it and have had it on my bulletin board ever since.  20 years later and I still love the picture!  This was the inspiration for my second green lady.  


I traced it and had it enlarged to be the same height as my other green lady.  When I traced it, I noticed that there was a cat sitting on the lady's shoulder.  I had never seen it before; or I hadn't remembered seeing it.  I'm going to imagine that it isn't there for my quilt and perhaps fill in the space with flowers.

I started by concentrating on the wings first.  Since I wanted them to be transparent, I pulled out all of the organza in my stash.  I had lots of colors that would work, but needed a large piece for the background of the wings.  So, I headed over to JoAnn Fabrics and found much more than I thought I needed in both organza and ribbons.  I found a luscious lime green organza, a sparkly white net, a sparkly pink organza and a peach floral sheer.  Then I picked up some ribbon in several shades of pink , a couple in bronze and finally some fake flowers.  


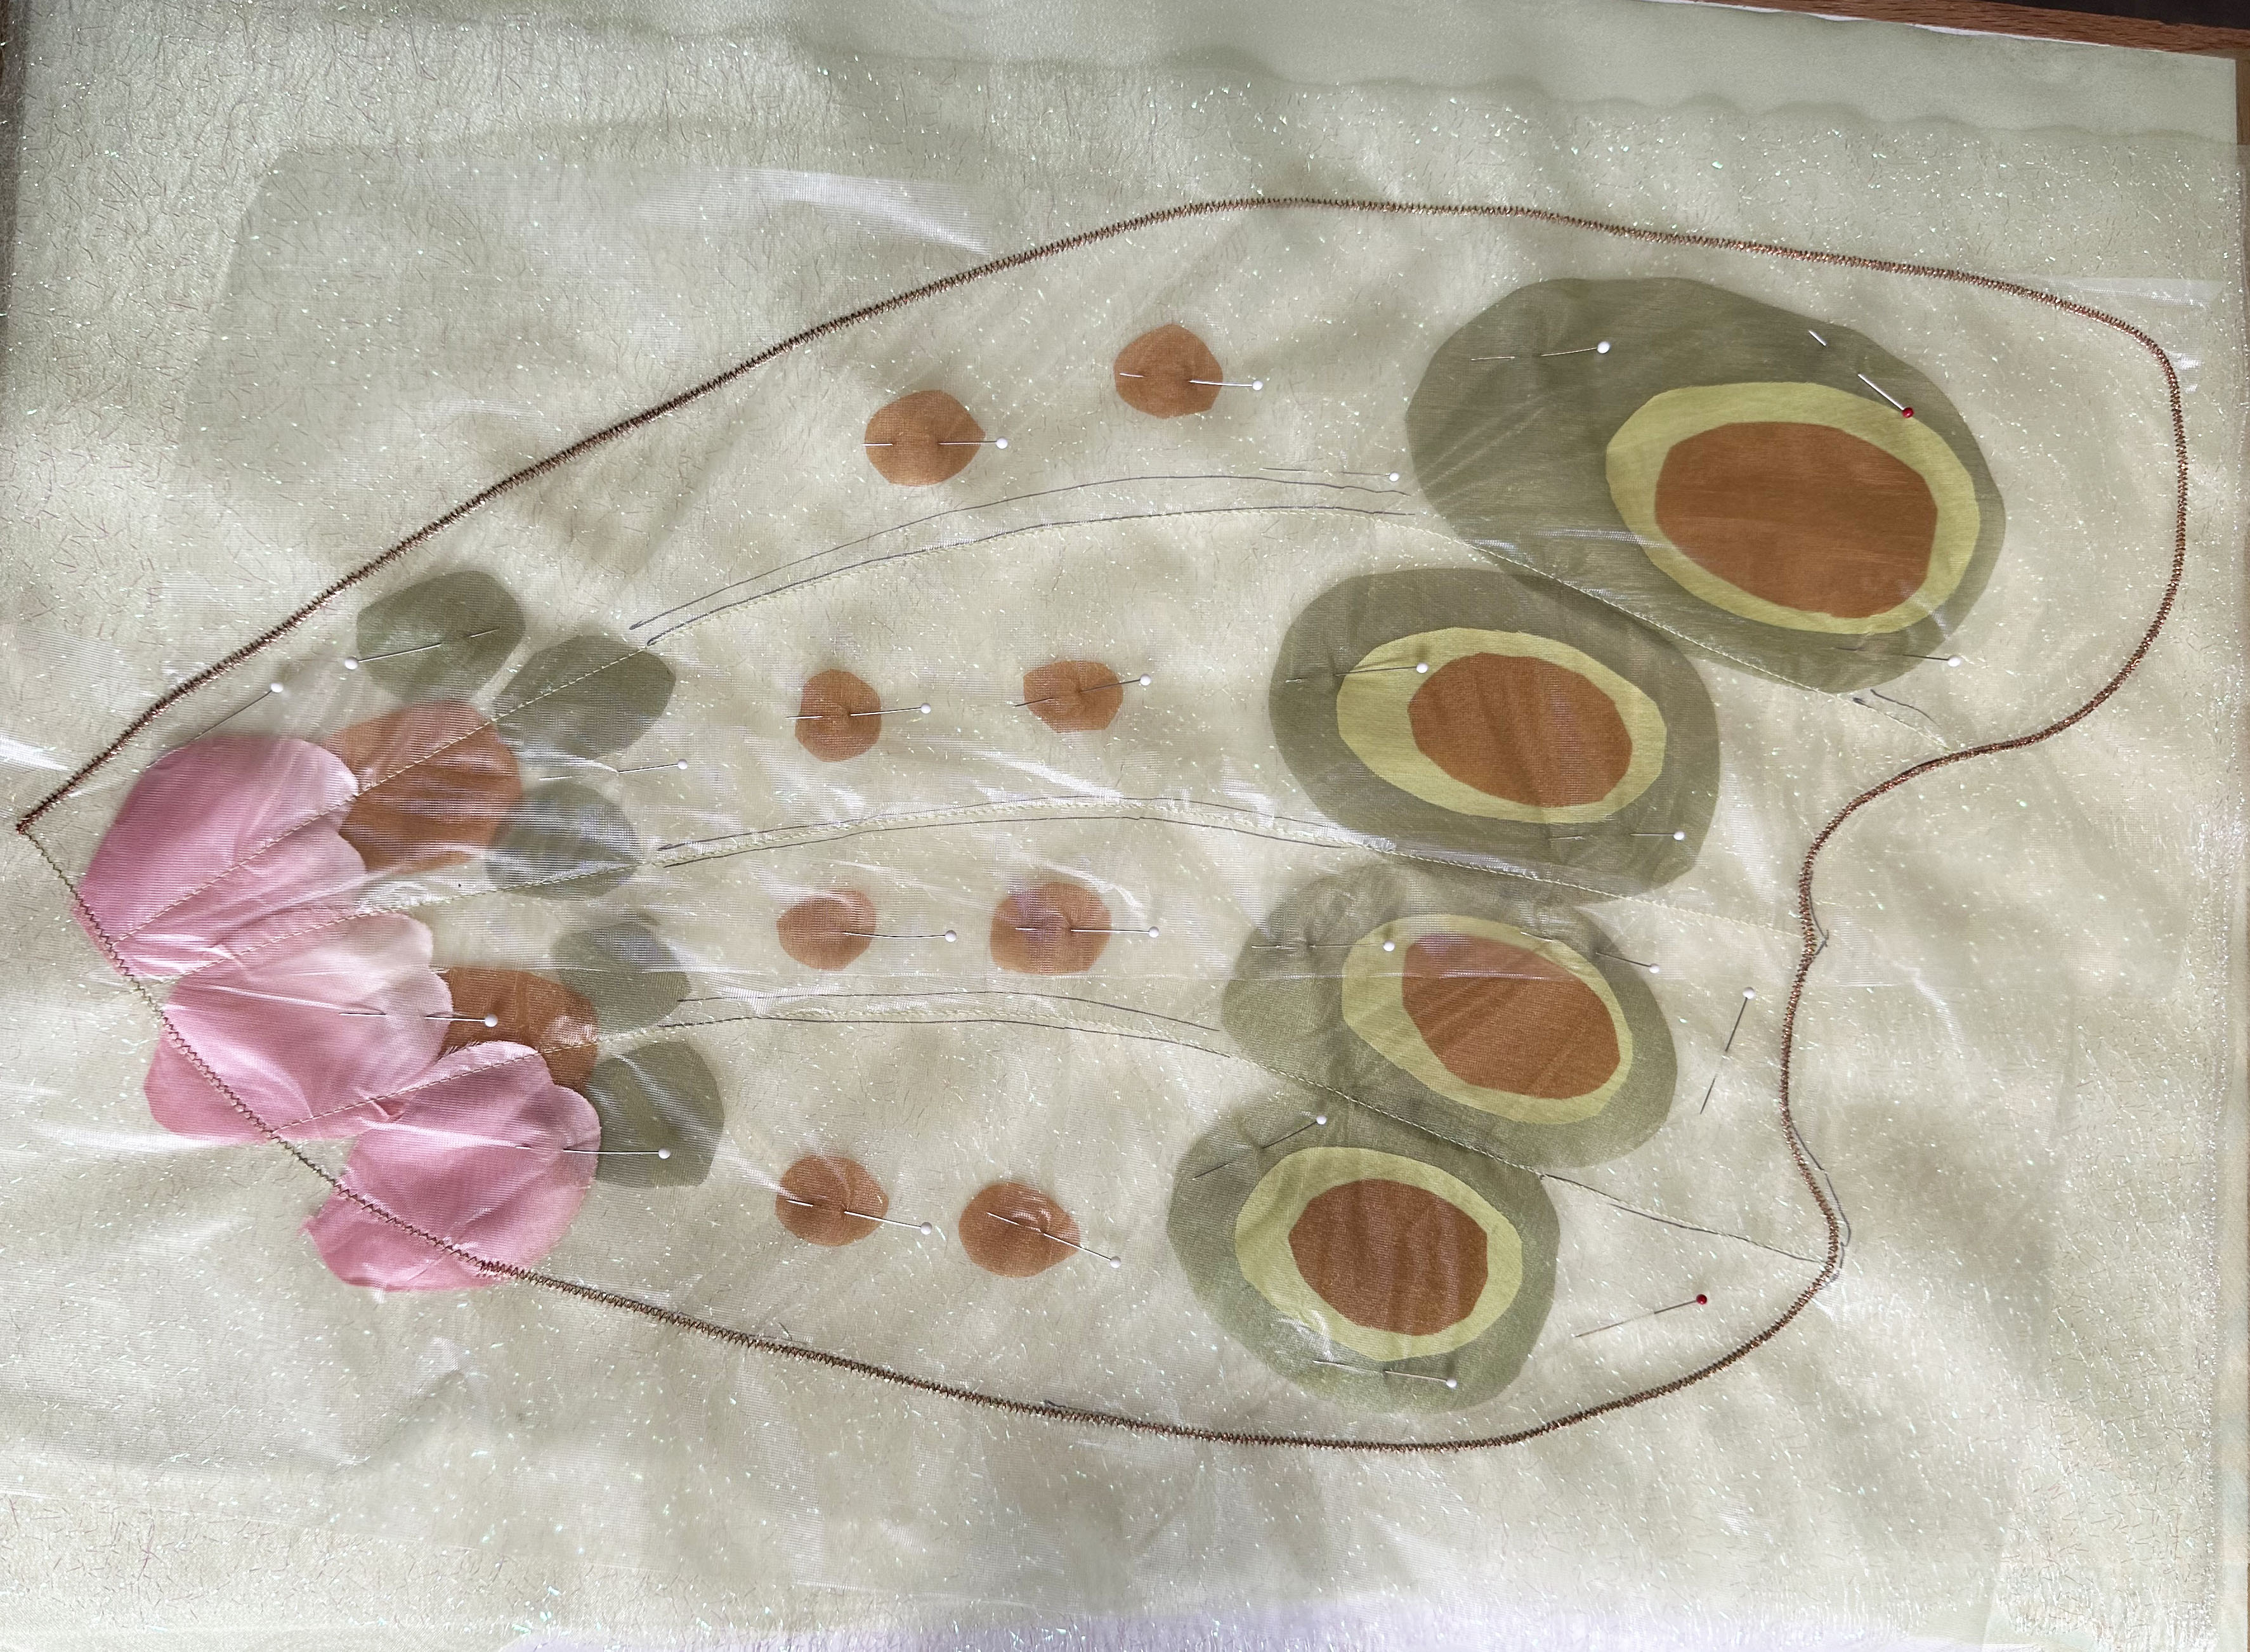
I backed some of the organza with Misty Fuse and then cut it into shapes for the eyes and embellishments on the wings.  This step was done first, using freezer paper templates.


I already had all kinds of stabilizers and decided on two for the wings.  For the bottom layer, I placed OESD Wash Away AquaMesh.  It has enough body to support the organza and stitching, but washes away to leave only the light transparent layers.  The top stabilizer was clear Solvy.  I could trace the design on this top layer, stitch the piece, and wash off the stabilizer and marker.


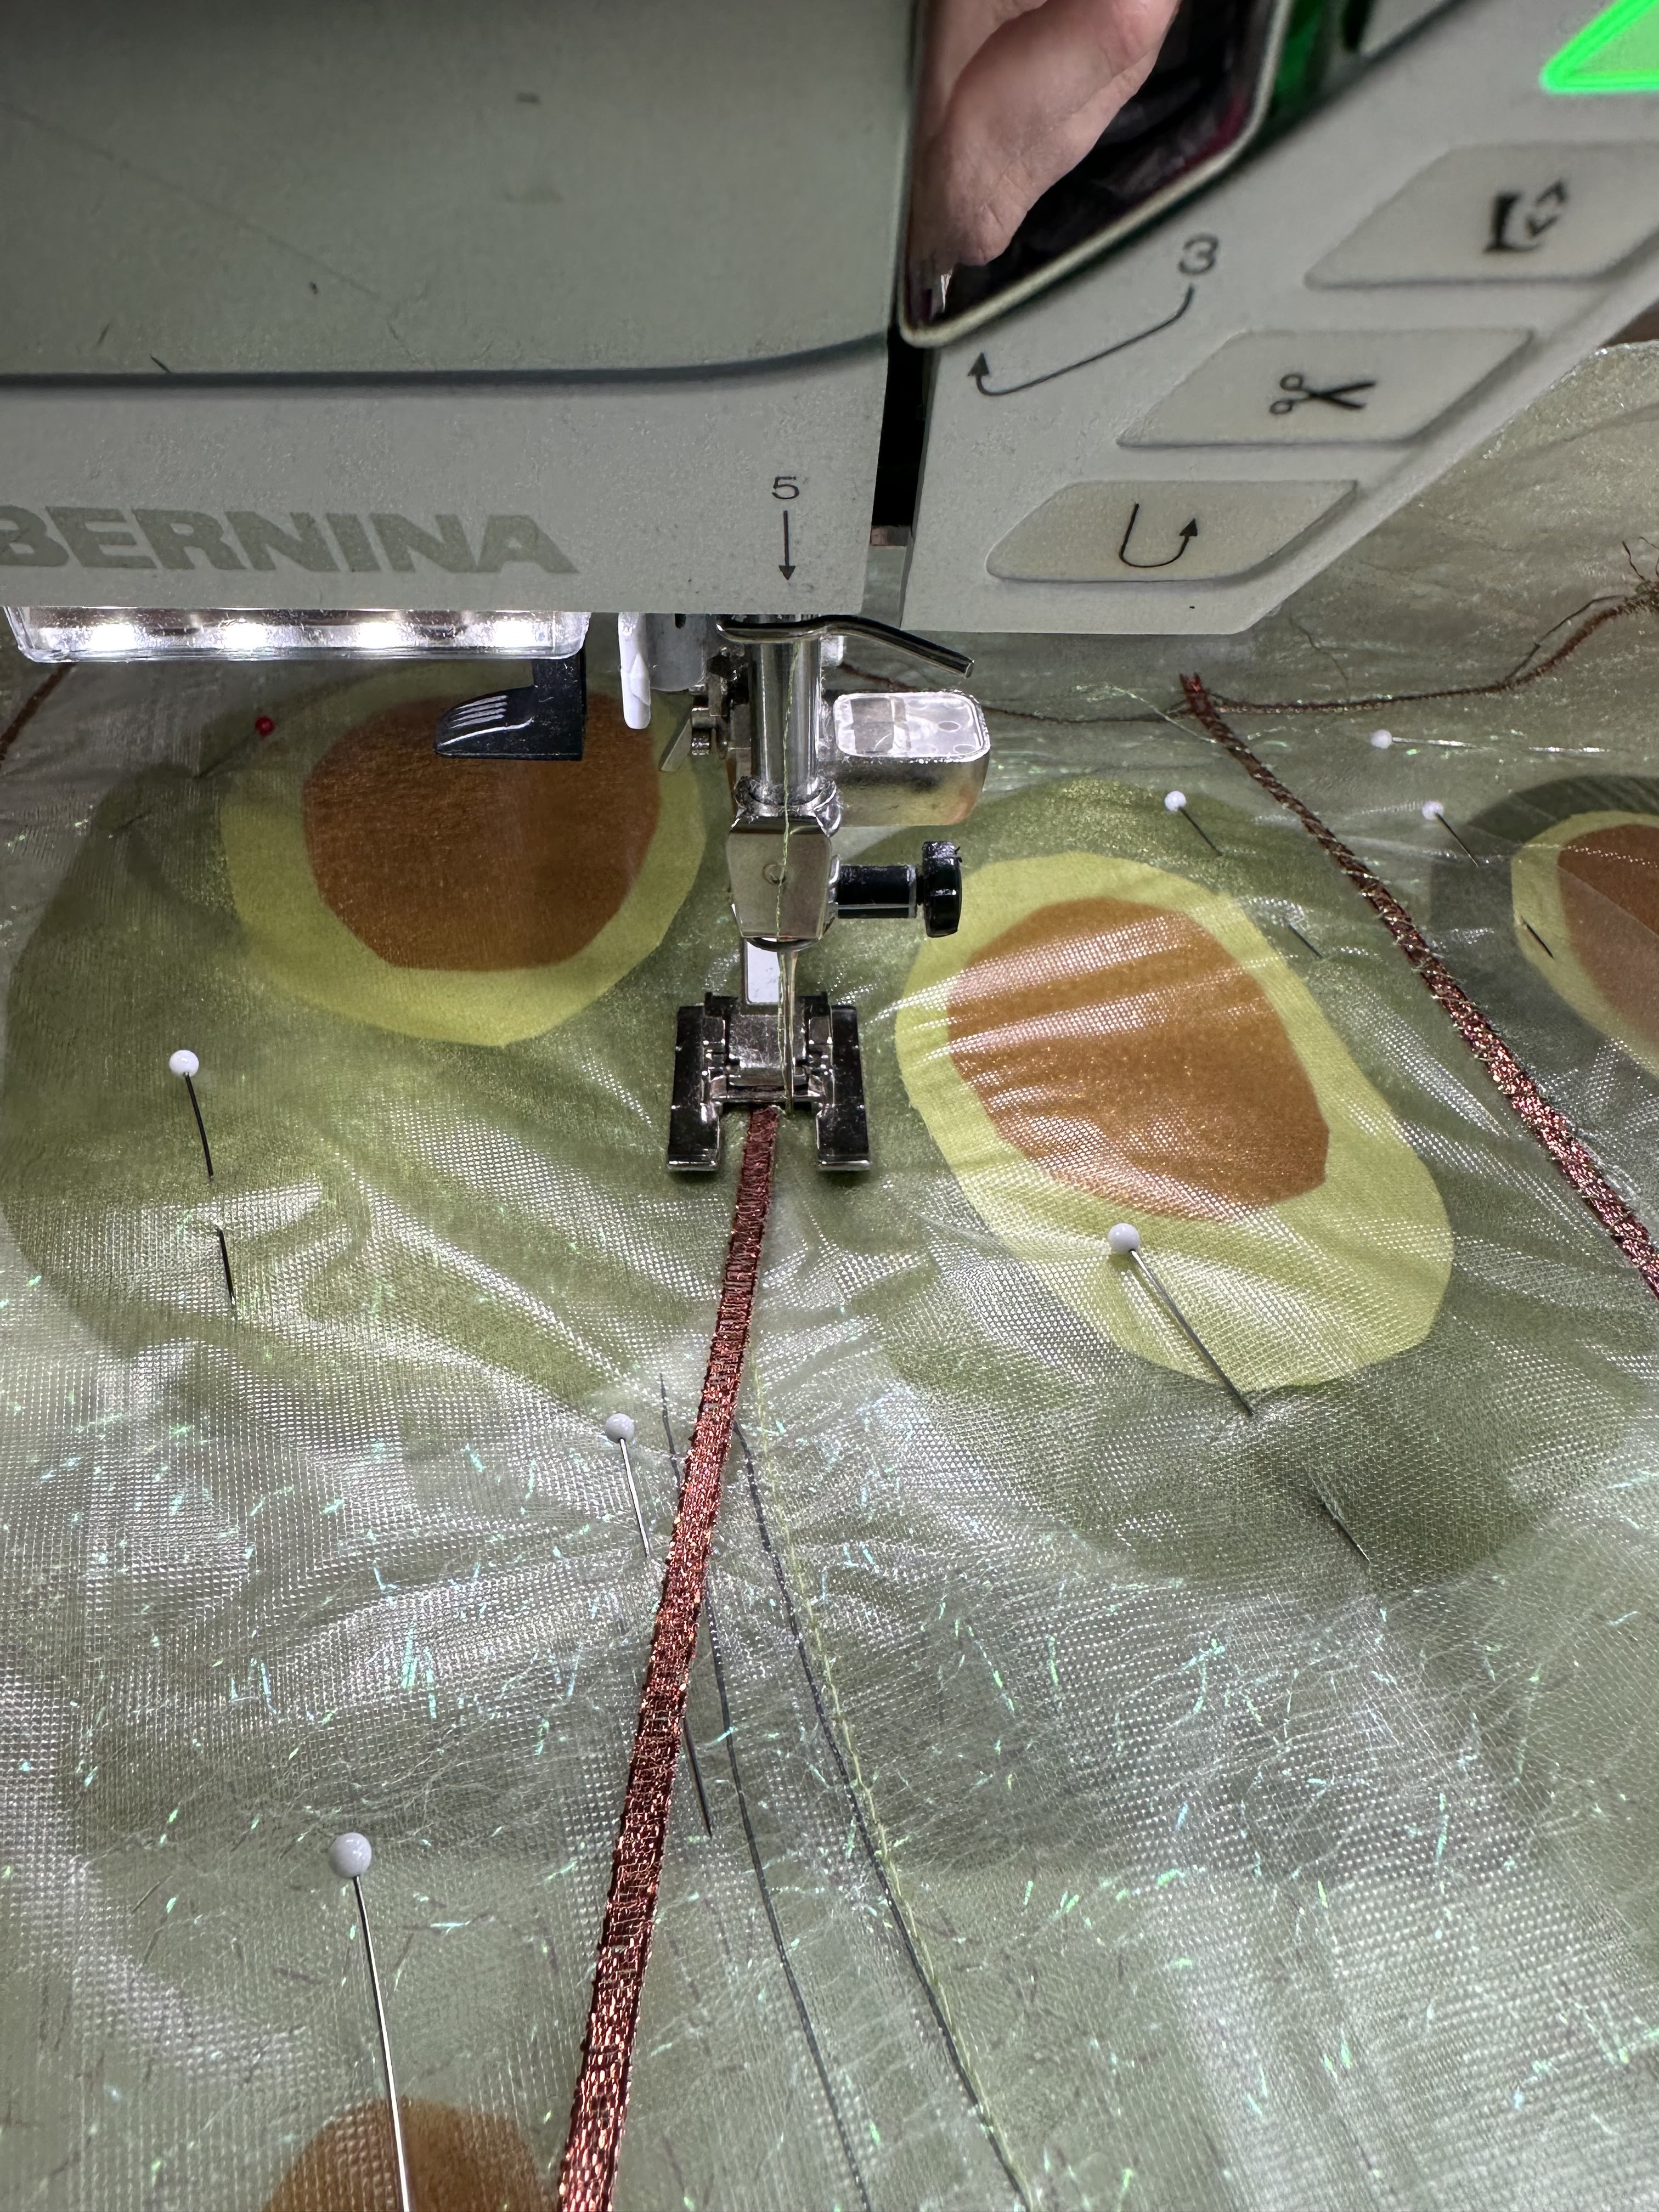
Here is the order of the layers:   AquaMesh; green organza, sparkly white net, eyes and embellishments backed with Misty fFse, and Solvy.  The sandwich was pinned together and stitched down with regular green thread on the outer edges and the lines between the wings.   I used one of the ribbons for the pieces between the ribs of the wings using a 4.5 W x 2.7 L stitch setting.  Zig Zag stitching was done as 2.0 W x 1.0 L for the veins in green sparkly thread, and 3.6 W x .65 L for the outer edges in bronze sparkly thread.  


When all the stitching was done, I trimmed the outer edges, leaving a little extra, then soaked and dried the pieces.  Here is one of the upper wings:


I hope you like it so far!